11 Ways to Open the On-Screen Keyboard in Windows 10

Windows 10's virtual keyboard is surprisingly useful and often becomes essential when your hardware keyboard fails. The On-Screen Keyboard (OSK) has been a built-in Windows feature since the XP era, and it's still going strong today. What's interesting here is how many users don't realize it exists until they need it — whether due to a stuck key, suspected malware infection, or a keylogger threat.
The beauty of this tool lies in its simplicity. It displays all standard keys on your screen, and you can interact with it using your mouse, a pointing device, or even keyboard shortcuts to navigate. Below, we'll walk you through 11 different methods to launch the On-Screen Keyboard on Windows 10.
How to Open the On-Screen Keyboard in Windows 10
- 1. Using a Keyboard Shortcut
- 2. Through the Start Menu
- 3. Via the Run Command
- 4. Using Command Prompt or PowerShell
- 5. From Ease of Access in Start Menu
- 6. Through PC Settings Ease of Access
- 7. Via the Classic Control Panel
- 8. Launching It Automatically at Startup
- 9. Enabling the Touch Keyboard
- 10. Customizing Your Virtual Keyboard
- 11. Pinning the Keyboard to Stay in Place
1. Using a Keyboard Shortcut
The quickest way to toggle the on-screen keyboard is pressing Win + Ctrl + O. This combination instantly opens or closes the tool.
If your keyboard is damaged and you can't type, try this workaround: Select the text "osk" using your mouse, copy it, then paste it into the Windows 10 search box.
2. Through the Start Menu
Type On screen keyboard into the search box on your Start Menu or taskbar, then press Enter. The application launches immediately.
Can't type because your keyboard is broken? Try method 5 below, or ask someone to send you the text "osk" via messaging. Simply copy and paste it into the search field using your mouse.

3. Via the Run Command
This classic method still works perfectly:
Step 1: Press Windows + R to open the Run dialog.
Step 2: Type OSK (case doesn't matter) and hit Enter. Done.

4. Using Command Prompt or PowerShell
For those comfortable with command-line tools, this approach is straightforward:
Open Command Prompt or PowerShell, type OSK, and press Enter. The keyboard appears in seconds.

5. From Ease of Access in Start Menu
Navigate to your Start Menu and click All apps. Find and expand the Windows Ease of Access folder, then select On Screen Keyboard. This method is especially helpful if your keyboard is completely unresponsive.

6. Through PC Settings Ease of Access
Step 1: Open the Settings app from your Start Menu.
Step 2: Click Ease of Access.
Step 3: Select Keyboard, then toggle the switch next to Turns on the on-screen keyboard to ON.

7. Via the Classic Control Panel
Step 1: Right-click the Start button and select Control Panel.
Step 2: Find and click Ease of Access.
Step 3: Click Ease of Access Center.
Step 4: Finally, click Start On-Screen Keyboard.

8. Launching It Automatically at Startup
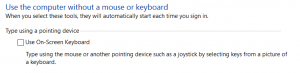
Want the keyboard to open every time Windows boots? From the Ease of Access Center, click Use the computer without a mouse or keyboard under Explore all settings.

Under Type using a pointing device, check the box for Use On-Screen Keyboard, then click OK. Now it will launch automatically on startup.
9. Enabling the Touch Keyboard
Windows 10 includes a separate Touch Keyboard designed for touchscreen devices. To enable it, right-click your taskbar, select Show touch keyboard button, and a keyboard icon appears near your volume control.
The real concern here is that this keyboard only appears when needed — tap the icon to use it, then it hides when you switch to your physical keyboard or move your mouse elsewhere.
For touch devices or remote desktop scenarios, go to Settings > Devices > Typing and enable Show the touch keyboard when not in tablet mode and there's no keyboard attached. The keyboard will automatically appear whenever you tap a text input field.
10. Customizing Your Virtual Keyboard
Once the on-screen keyboard is displayed, click the Options button in the bottom-right corner to access customization settings. You'll find several useful configurations:
- Adjust Scanning Speed to control how quickly the keyboard scans through keys.
- Use click sound — Enable audio feedback when you press keys.
- Show keys to make it easier to move around the screen — Keys highlight as you type for better visibility.
- Turn on numeric keypad — Expands the keyboard to include a dedicated number pad.
- Click on keys (or press Alt + C) — Interact with the keyboard by clicking individual keys with your mouse or pointing device.
- Hover over keys (or press Alt + H) — Select keys by hovering your mouse over them. Use the Hover duration slider to set how long you need to hover before a key activates.
- Scan through keys (or press Alt + S) — Use external devices like switches, spacebar, or gamepads to navigate. The keyboard continuously scans, and you activate keys by pressing your chosen input device.
- Use Text Prediction (or press Alt + T) — The keyboard suggests words as you type, improving speed and reducing spelling errors.
- Enable automatic spacing after selected words by pressing Alt + W.
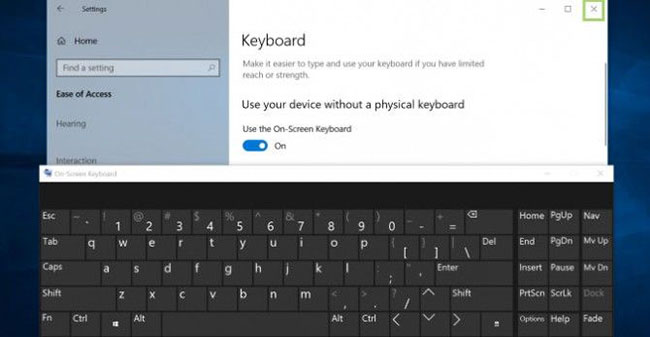
11. Pinning the Keyboard to Stay in Place
Want the keyboard to remain visible on your screen? Follow these steps:
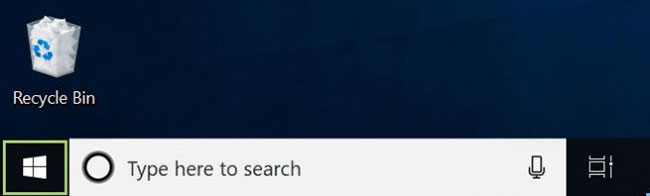
Step 1: Click the Windows button at the bottom-left of your screen to open the Start Menu.
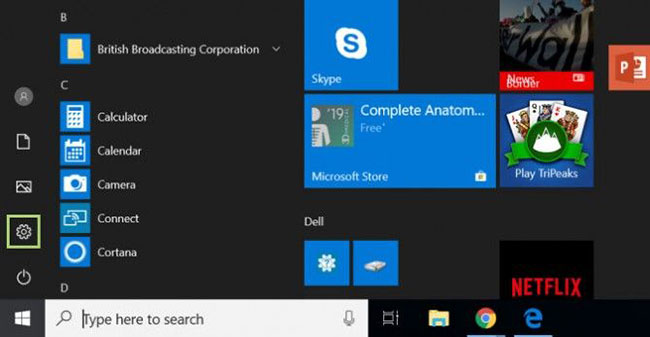
Step 2: Select Settings.
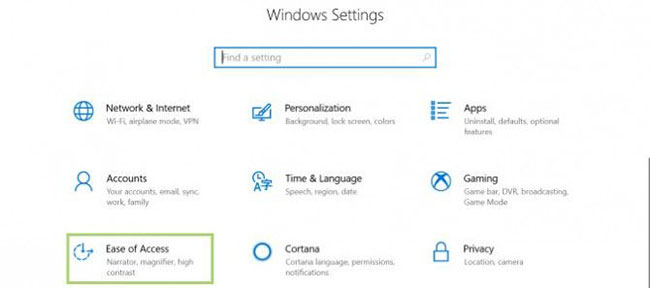
Step 3: Click Ease of Access in Windows Settings.
Step 4: Select Keyboard under the Interaction section.
Step 5: Toggle the Use the On-Screen Keyboard option to ON.

Step 6: Close the dialog by clicking the X button. Your virtual keyboard now stays in its position even when you're not actively using it.
That covers all the major ways to access and customize Windows 10's on-screen keyboard. Whether you're dealing with hardware issues or just prefer an alternative input method, these 11 methods should handle any scenario you encounter.
Related Articles
- 8 Effective Methods to Monitor Your Hard Drive Health and Catch Problems Early
- How to Fix the Task Host Window Blocking Windows Shutdown
- How to Restore a Windows System Using UEFI-Compatible .tib Ghost Files
- Understanding Mesh WiFi: How Does a Mesh Network System Actually Work?
- The 22 Best Tools for Creating Bootable USB Drives
No Comment to " 11 Ways to Open the On-Screen Keyboard in Windows 10 "