“Your Microsoft Exchange administrator has blocked the version of Outlook that you are using. Contact your administrator for assistance.”
.png)
Users will see the following error message in Outlook:
“Your Microsoft Exchange administrator has blocked the version of Outlook that you are using. Contact your administrator for assistance.”

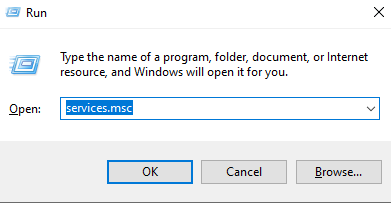
➤ Download & Install Microsoft 365 Apps by Office Deployment Tool
Outlook will now be disabled or trying to connect. You CAN NOT send and receive any email.
The reason is that you are using Microsoft 365 (email service) on Office (Outlook) 2007, 2010, 2013. Detail as below:
"After November 1, 2021, only Outlook 2013 Service Pack 1 (with latest fixes) and later will be able to connect to Microsoft 365 services. It’s worth noting here that Outlook 2007, 2010, and Office 2013 versions earlier than 15.0.4971.1000 *and Office 2016 versions earlier than 16.0.4600.1000 aren’t supported"
If you are using Office 2007, 2010 please note the following times, your Outlook will not be able to connect to Mail Exchange (Microsoft 365):
- The block will start rolling out on November 1st 2021 for users on Outlook 2007 and will proceed in a phased rollout.
- The block has started rolling out for Outlook 2010 users on January 11, 2022 and will proceed in a phased rollout.
Outlook users will see the following error message in Outlook, when they experience the block that we are rolling out: “Your Microsoft Exchange administrator has blocked the version of Outlook that you are using. Contact your administrator for assistance.”
Why are we blocking old versions?
Older versions of Outlook, such as Outlook 2007 and 2010 are incompatible with the following upcoming service changes, which is prompting this controlled block:
- Support for basic authentication is ending to increase the security of Microsoft 365 by relying on modern authentication protocols, which are not only more secure, but also provide compliance and policy controls to help you manage your data.
- We’re working on adding support for HTTP/2 in Microsoft 365. HTTP/2 is a full duplex protocol, which decreases latency through header compression and request multiplexing. On the service side, we’ll be able to better prioritize requests and more effectively push data to clients.
- It can be a challenge to stay current, but there are many reasons why staying current is a good idea:
- Security fixes will protect your devices against known vulnerabilities.
- Reliability – over the last five years we’ve eliminated 75% of crashes in Outlook!
- Updated versions have all the coolest new features to make your life easier!
Solution
Users can immediately start using Outlook on the web through a browser on their Windows (or any other) device. This is temporary solution.
I recommend switching to Office 365 or higher versions of Office like Office 2019 or Office 2021.
➤ Download & Install Microsoft 365 Apps by Office Deployment Tool
➤ How to download & install Office Standard 2019
 Outlook on the web
Upgrade guidance
- For Office 2007 and 2010, use the roadmaps listed below to move to Microsoft 365 Apps. If your organization is highly regulated or uses devices that can’t take updates, consider Office 2019
- For Office 2013, move to Version 15.0.4971.1000 of Office 2013 (Service Pack 1 with the October 2017 Update)
- For Office 2016, move to Version 16.0.4600.1000 of Office 2016 (With the November 2017 Update, KB4051890)
- Office 2007 end of support roadmap
- Office 2010 end of support roadmap
Conclusion
Above is all information related to this error. If you or your company are using Microsoft 365 services on Office software versions 2013, 2010, 2007, please pay attention.