How to Access BIOS on Different Computer Models: A Complete Guide
Your computer's BIOS springs to life the moment you hit the power button. It's the first component that runs, loading your operating system and all your personal settings before you even see Windows.
Whether you're updating BIOS firmware or diagnosing system errors, knowing how to enter BIOS is essential for any PC user. On Windows systems, you typically just need to press the correct key during startup — the most common ones are F10, F2, F12, F1, or DEL.

But before you start pressing keys or tweaking settings, let's walk through everything you need to know about BIOS and exactly how to access it on your laptop or desktop.
Contents
What is BIOS?
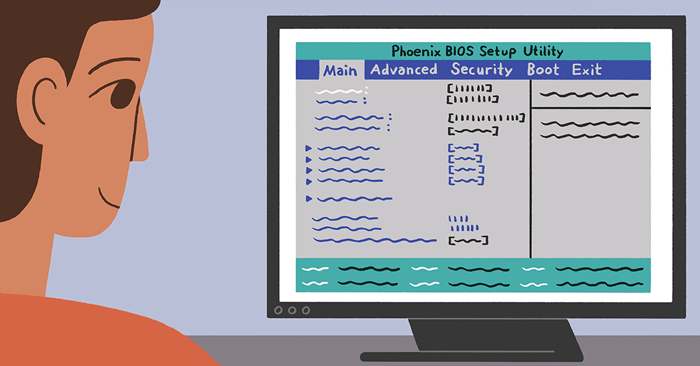
BIOS stands for Basic Input/Output System — a collection of programmed instructions stored on your motherboard's firmware chip. Think of it as the bridge between your hardware and software, managing all the basic computer functions you rely on every day.
Your BIOS is built into your computer's motherboard, essentially acting as the facilitator for all PC operations. It's written to and stored on EPROM (erasable programmable read-only memory), which means it retains all its data even when your computer loses power. When you boot up again, BIOS retrieves that stored information.
The BIOS system controls the flow of data between your operating system and attached devices — your hard drive, keyboard, display adapter, printer, mouse, and everything else. It's the invisible orchestra conductor making sure all the hardware players stay in sync.
Every time you power on, BIOS runs through a process called Power-On Self Test (POST). This routine checks whether your attached devices are working properly and in their correct positions. If everything checks out, your computer continues booting normally and lands you on the Windows loading screen within seconds. But if BIOS detects a problem, you'll see an error message or hear a series of beeps — each beep pattern signals a specific hardware issue.
BIOS Evolution and Modern Firmware
BIOS has been around since the 1980s, and while it's delivered significant improvements in efficiency, it was never designed for today's computing demands. Modern drives store multiple terabytes of data, making traditional BIOS increasingly outdated. Its 16-bit processor limitation and 2.1 TB boot drive ceiling simply can't handle modern storage — many new systems ship with 3TB or larger drives right out of the box.
That's where UEFI comes in. UEFI (Unified Extensible Firmware Interface) is the modern successor to BIOS, operating in 32-bit or 64-bit mode and theoretically supporting drives up to 9.4 zettabytes. What's interesting here is that UEFI doesn't just replace BIOS — it actually functions as a mini operating system running on your PC's firmware layer.
Essentially, whether your system runs traditional BIOS or newer UEFI firmware, both serve the same fundamental purpose: they boot your machine and load essential system functions. Regular BIOS access allows you to perform preventive maintenance that keeps your computer running smoothly.
Core BIOS Functions
Now that you understand what BIOS does at a basic level, let's dive deeper into its actual operations. BIOS performs four primary functions:
POST (Power-On Self Test)
POST is your computer's internal health check. It scans your hardware configuration and confirms nothing is out of place and no errors exist on the operating system. POST examines everything — from your keyboard and disk drives to your RAM speed and built-in ports. When everything passes inspection, POST clears the way for normal startup.
Detect a problem? BIOS alerts you through either an error message on screen or a series of diagnostic beep codes. Each beep sequence corresponds to a specific error type, so if you hear beeping, you can look up the code to identify what's wrong.
CMOS Setup
Your computer stores all low-level settings — system time, hardware configuration, and user preferences — in a special chip called CMOS (Complementary Metal-Oxide Semiconductor). Every modification you make in BIOS gets saved to this dedicated memory chip, which preserves your settings even after shutdown.
Bootstrap Loader
The Bootstrap Loader is a program stored in your computer's EPROM or ROM that reads your hard drive's boot sector, ensuring the system follows the complete operating system loading process correctly. When you restart, Bootstrap Loader triggers POST, then loads Windows into memory. Newer machines have replaced this component with EFI or Extended Firmware Interface technology.
BIOS Driver
BIOS Driver refers to multiple programs stored across your system's memory chips. These low-level drivers initialize your system at startup and manage basic operational controls on your computer.
Entering BIOS on Windows 10
When you're facing stubborn system errors or need to swap your processor for an upgraded model, accessing BIOS becomes necessary.
Windows 10 machines offer two straightforward methods to access, review, and update your BIOS. Try both approaches to see which works best for your setup.
Method 1: Using Keyboard Shortcuts
Modern computers complete POST incredibly fast — so fast that if you blink, you'll miss your window and land straight on the Windows loading screen. You need to act quickly, pressing the correct key immediately after powering on.
Different manufacturers assign different access keys. HP laptops typically use F10 or ESC, while DEL and F2 are the standard shortcuts for most PCs. If you're unsure which key applies to your system, check this reference list:
- Acer: F2 or DEL
- ASUS: F2 for all PCs; F2 or DEL for motherboards
- Dell: F2 or F12
- HP: ESC or F10
- Lenovo: F2 or Fn + F2
- Lenovo (PC): F1
- Lenovo (ThinkPads): Enter + F1
- MSI: DEL for motherboards and PCs
- Microsoft Surface (tablets): Press and hold the volume up button
- Standard PC: F2
- Samsung: F2
- Sony: F1, F2, or F3
- Toshiba: F2
Some manufacturers require you to press the hotkey repeatedly, while others ask you to press an additional button alongside the hotkey. For the most accurate information, check your system's manual or visit the manufacturer's support website.
Method 2: Using Windows 10 Settings
As computers get faster, boot times shrink, making it harder to catch that crucial moment for BIOS access. Fortunately, Windows 10 includes a built-in setting to launch BIOS directly from your system settings.
Step 1: Open Windows Settings. Go to Start > Settings from the left control panel. You can also press Windows + I for quick access.
Step 2: In the Settings window, scroll down and locate Update & Security.
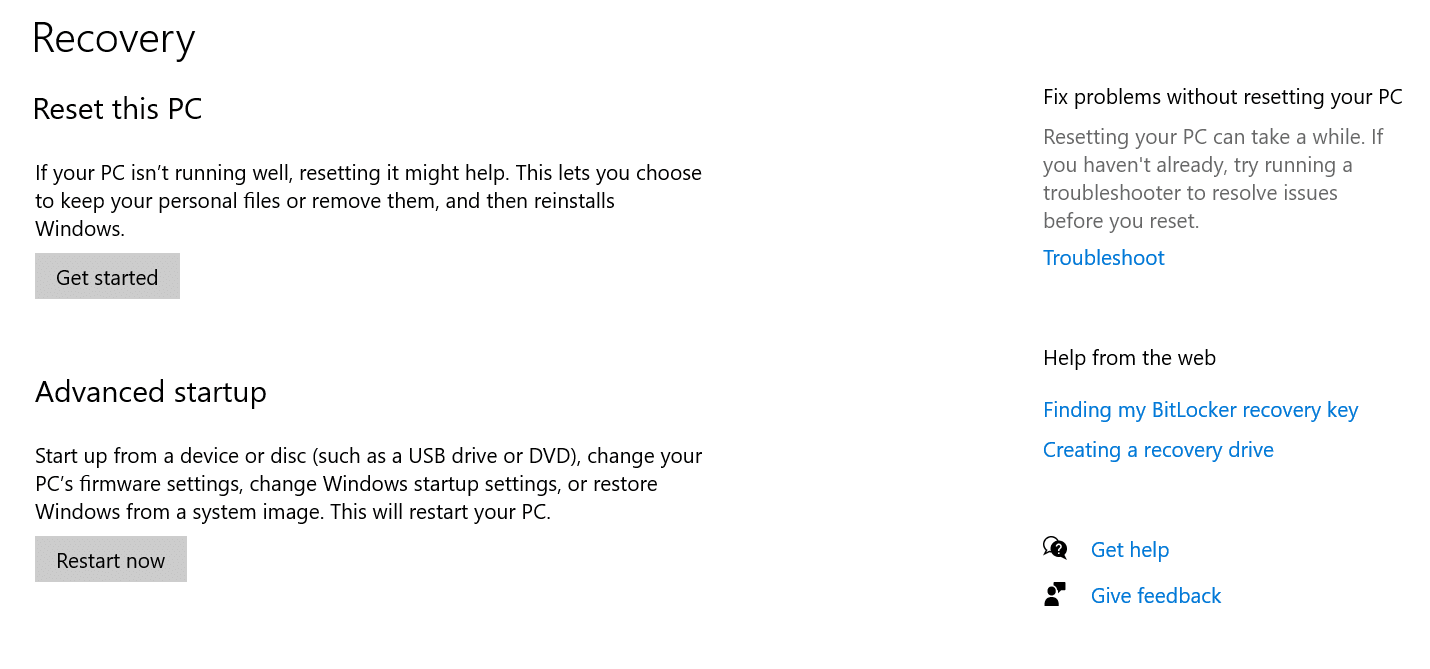
Step 3: Select Recovery.
Step 4: Click Restart now under the Advanced startup section. This button initiates a reboot that lets you configure or restore your system.
After your computer restarts, you'll see a special menu with options like Use a device, Continue, Turn off your PC, or Troubleshoot.
Step 5: Select Troubleshoot.
From here, choose Advanced options, then select UEFI Firmware Settings. This grants you access to your Windows 10 BIOS.
Step 6: Confirm the restart prompt.
This method also works on Windows 8 and 8.1 systems.
BIOS Access Keys by Computer Model
Sony VAIO Laptops
- To enter BIOS during startup, press and hold F2
- To access Recovery, press and hold F10
HP – COMPAQ Laptops
- Some HP models require pressing ESC (Escape key) to enter BIOS
- To enter BIOS during restart, press and hold F10 or F2, F6 on certain models
- To access Recovery, press and hold F11
- To access the Boot menu, press and hold F9
Acer Laptops
- To access the Boot menu during restart, press and hold F12
- To enter BIOS during restart, press and hold F2 or DEL (on older models, try F1 or Ctrl + Alt + Esc)
ASUS Laptops
- To enter BIOS during restart, press and hold ESC. Some models require you to hold F2, press the Power button, then continue holding F2 until the BIOS screen appears
- To access the Boot menu during restart, press and hold F2
Lenovo ThinkPad Laptops
- To enter BIOS during restart, press and hold F1 or F2
- To access Recovery, press and hold the ThinkVantage button
- To access the Boot menu during restart, press and hold F12
Dell Laptops
- To enter BIOS during restart, press and hold F2
- To access Recovery, press and hold F8, then select Repair your Computer
- To access the Boot menu during restart, press and hold F12
Alienware Laptops
- To enter BIOS during restart, press and hold F2
Razer Laptops
- To enter BIOS during restart, press and hold F1 or DEL
BIOS Access Keys by Motherboard
- Abit Motherboards — Press DEL
- Acer Motherboards — Press F2 or DEL (on legacy systems, try F1 or Ctrl + Alt + Esc)
- ACube Systems Motherboards — Press F2 or DEL
- AMAX Motherboards — Press F2 or DEL
- AOpen Motherboards — Press F2 or DEL
- ASRock Motherboards — Press F2
- ASUS Motherboards — Press DEL, Print, or F10
- Biostar Motherboards — Press DEL
- BFG Motherboards — Press DEL
- Chassis Plans Motherboards — Press F2 or DEL
- Freescale Motherboards — Press DEL
- DFI Motherboards — Press DEL
- ECS Elitegroup Motherboards — Press DEL or F1
- EPoX Motherboards — Press F2 or DEL
- EVGA Motherboards — Press DEL
- First International Computer Motherboards — Press F2 or DEL
- Fujitsu Motherboards — Press F12 (or F11) to access Boot Menu, then press Tab to switch to Application Menu and select BIOS Setup
- Foxconn Motherboards — Press DEL
- Gigabyte Motherboards — Press DEL
- Gumstix Motherboards — Press F2 or DEL
- Intel Motherboards — Press F2
- JetWay Motherboards — Press DEL
- Lanner Inc Motherboards — Press F2 or DEL
- Leadtek Motherboards — Press F2 or DEL
- Lite-On Motherboards — Press F2 or DEL
- Mach Speed Motherboards — Press DEL
- MSI (Micro-Star) Motherboards — Press DEL
- NZXT Motherboards — Press F2 or DEL
- PCChips Motherboards — Press DEL or F1
- PNY Motherboards — Press F2 or DEL
- Powercolor Motherboards — Press F2 or DEL
- Sapphire Motherboards — Press DEL
- Shuttle Motherboards — Press DEL or Ctrl + Alt + Esc
- Simmtronics Motherboards — Press F2 or DEL
- Soyo Motherboards — Press DEL
- Super Micro Motherboards — Press DEL
- TYAN Motherboards — Press DEL or F4
- VIA Motherboards — Press F2 or DEL
- Vigor Gaming Motherboards — Press F2 or DEL
- XFX Motherboards — Press DEL
- ZOTAC Motherboards — Press DEL
Can't Access BIOS? Try These Fixes
If you're still struggling to reach BIOS — whether due to lightning-fast boot times or suspicion of malware infection — you'll want to get in as soon as possible. Try these two troubleshooting methods to regain BIOS access.

1. Disable Fast Startup
If your computer powers up so quickly that you can't time the hotkey press, slow down the boot process by disabling your system's fast startup feature. Here's how:
- Navigate to Power options in the Control Panel
- Click Choose what the power button does on the left side
- Click Change settings that are currently available above the Power and sleep button and lid settings section
- Uncheck Turn on fast startup
- Restart your computer and try the BIOS hotkey again
2. Use an Emergency Boot Disk
If your computer refuses BIOS access or displays the dreaded blue screen of death, the real concern is you may be facing a serious boot error. In these cases, create an emergency boot disk on USB to get your system operational again and access BIOS.
After booting from your USB drive, follow these steps:
- Click Repair your computer
- Click Troubleshoot
- Click UEFI Firmware Settings
- Select Restart
If your system still won't cooperate, you may need to contact a local computer repair specialist to diagnose and resolve the underlying hardware issues.
Related Articles
- 8 Effective Methods to Monitor Your Hard Drive Health and Catch Problems Early
- How to Fix the Task Host Window Blocking Windows Shutdown
- How to Restore a Windows System Using UEFI-Compatible .tib Ghost Files
- Understanding Mesh WiFi: How Does a Mesh Network System Actually Work?
- The 22 Best Tools for Creating Bootable USB Drives
No Comment to " How to Access BIOS on Different Computer Models: A Complete Guide "