AI News

  • Loading...
Browsing Category " Microsoft Excel "

Save Table as Image Excel with Just 3 Simple Steps

On


This is a skill in Excel that you should have. It is highly applicable in your daily work.

Here are 3 simple steps, keep in mind and put them into practice.


➠ Follow & send us a message on QTitHow for answers to IT issues.


How to do:

Step 1: Select the data area in the Table that you want to save. Select Copy > Copy as Picture


Copy the data area in the Table


Step 2: A window will appear - Copy Picture, keep the default settings and press OK


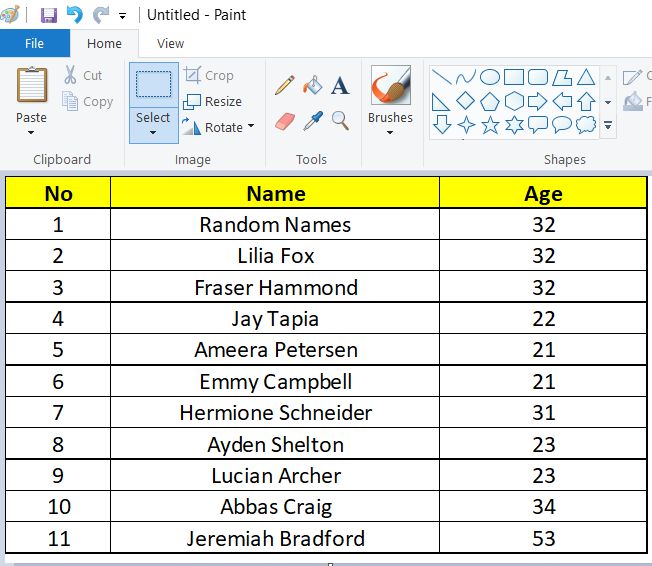
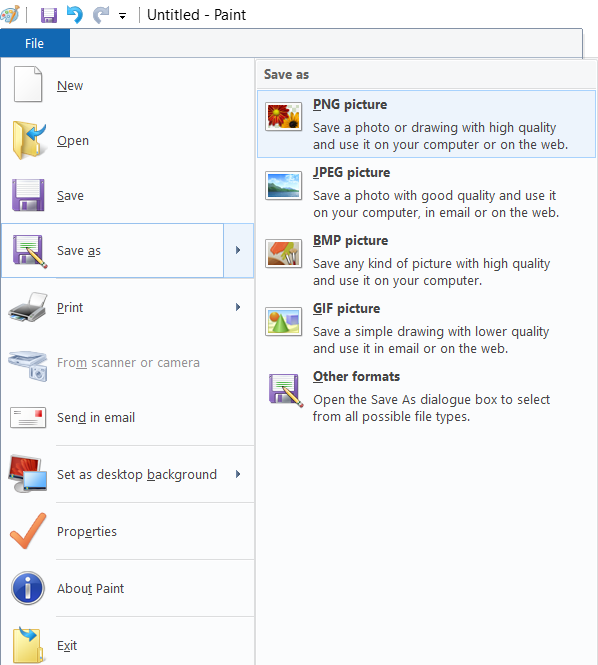
Step 3: Open the Paint program in Windows. Then Paste directly into Paint. Finally, adjust the length and width to suit and save it as an image file (PNG or JPG).


Paint program on Windows


Save as PNG or JPG


In addition to being able to save as an image file as above (in step number 3), you can Paste it directly into Email on Outlook, Word, Power Point... (data after Paste will be in the form of an image).


Conclusion:

With the above 3 steps, you can process data on Excel much more flexibly. Thank you for following the article.

Export Graph/Chart from Excel to PDF

On


Have you ever had a situation where you have to save all charts or graphs on an Excel report file to a PDF file (not including the content/text on the file)? I have already met.

In many cases you just want to display loud and clear charts/graphs to view and compare them. This article is the solution for you. In this tutorial I will guide you in 2 parts:


Part 1: Save/Export one chart/graph from excel to PDF file
Part 2: Save/Export multiple charts/graphs from Excel to PDF file.

(Note: Before doing this please back up the original excel file.)


➠ Follow & send us a message on QTitHow for answers to IT issues.


How to do:


Part 1: Instructions to save/export one chart/graph from Excel to PDF

Step 1: Right-click on an empty area on the chart/graph in the Excel file which you want to export it.

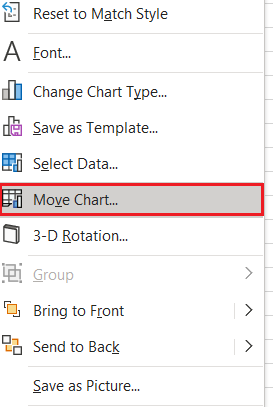
Step 2: Select Move Chart... A Move Chart window appears, click New sheet. Then press OK.


Move chart function on Excel


Click New sheet

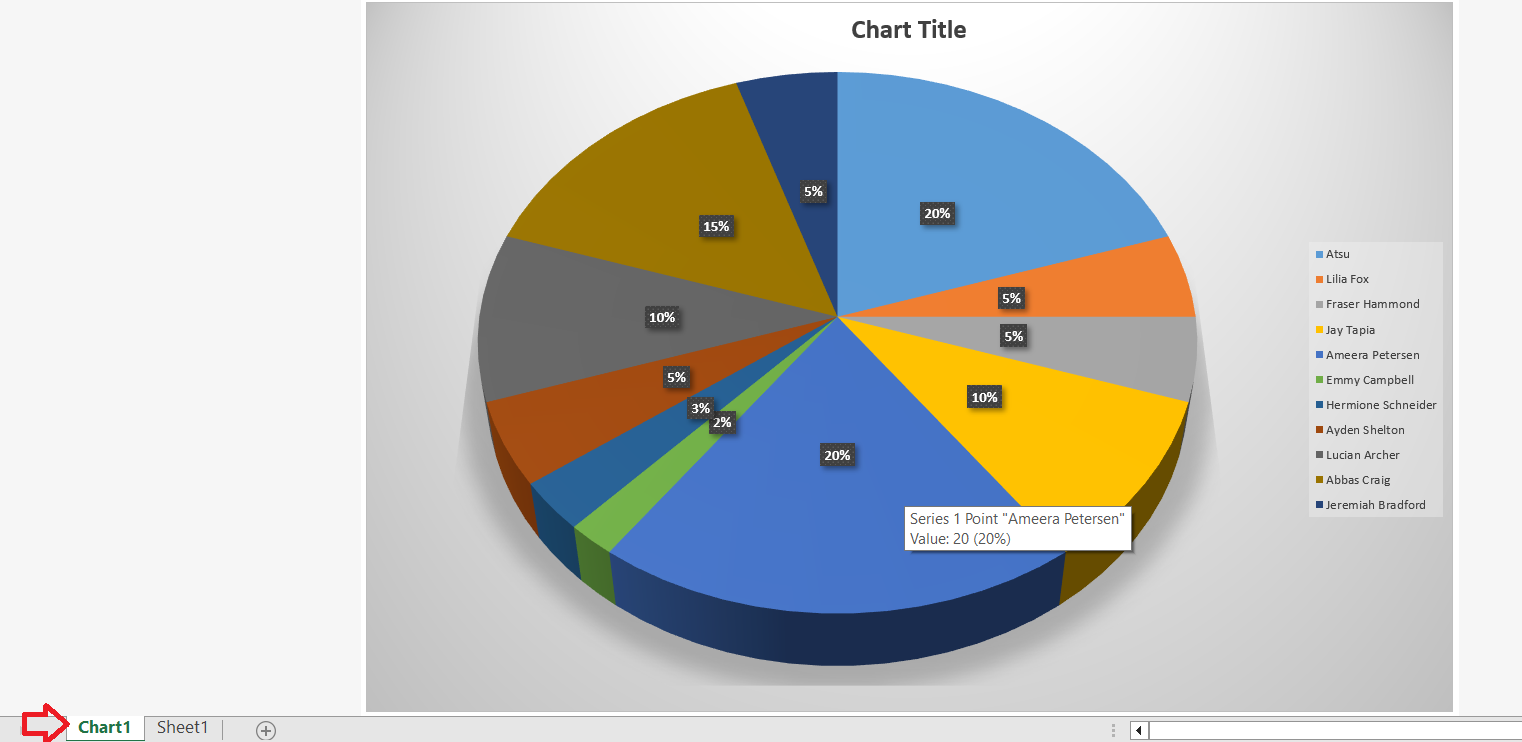
Step 3: Now the selected chart will be transferred to a new sheet named Chart 1. Next, click File > Save as (Save a copy) > Save as type = "PDF".


One new sheet "Chart 1" be created


Save as type to PDF

Done, you have finished exporting or separately saving a desired chart/graph from an Excel file to a PDF file.


Results:  save/export one chart/graph from Excel to PDF


Part 2: Instructions to save/export multiple charts/graphs from Excel to PDF

Step 1: Please do steps 1 & 2 (of part 1) for all the charts you want to export to PDF file.

Step 2: Click to select all the newly created sheet charts (in the example below choose: chart 1, chart 2).

  1. To select multiple adjacent chart sheets in the Sheet bar, please hold the Shift key and click the first chart sheet and the last chart sheet;
  2. To select multiple non adjacent chart sheets in the Sheet tab bar, please hold the Ctrl key and click each chart sheet one by one.


Step 3: Same as step 3 of part 1.

Done, now all charts/graphs have been saved on the PDF file.


Results: save/export multiple charts/graphs from Excel to PDF

Conclusion:

This trick is pretty cool, isn't it, it helps you to export charts/graphs to a pdf file with a large size and very clear display (without text).


Maybe you are interested?

Is it possible? Export all images at once on Excel file

On


The usual way you save images from an Excel file is to use the Save as copy feature on Excel, is that correct?

However, in case an Excel file has a lot of images and you want to save all those image files in one folder. So what do you have to do to be the best? If you use the Save as copy method one by one, it will take a lot of time and difficulty.


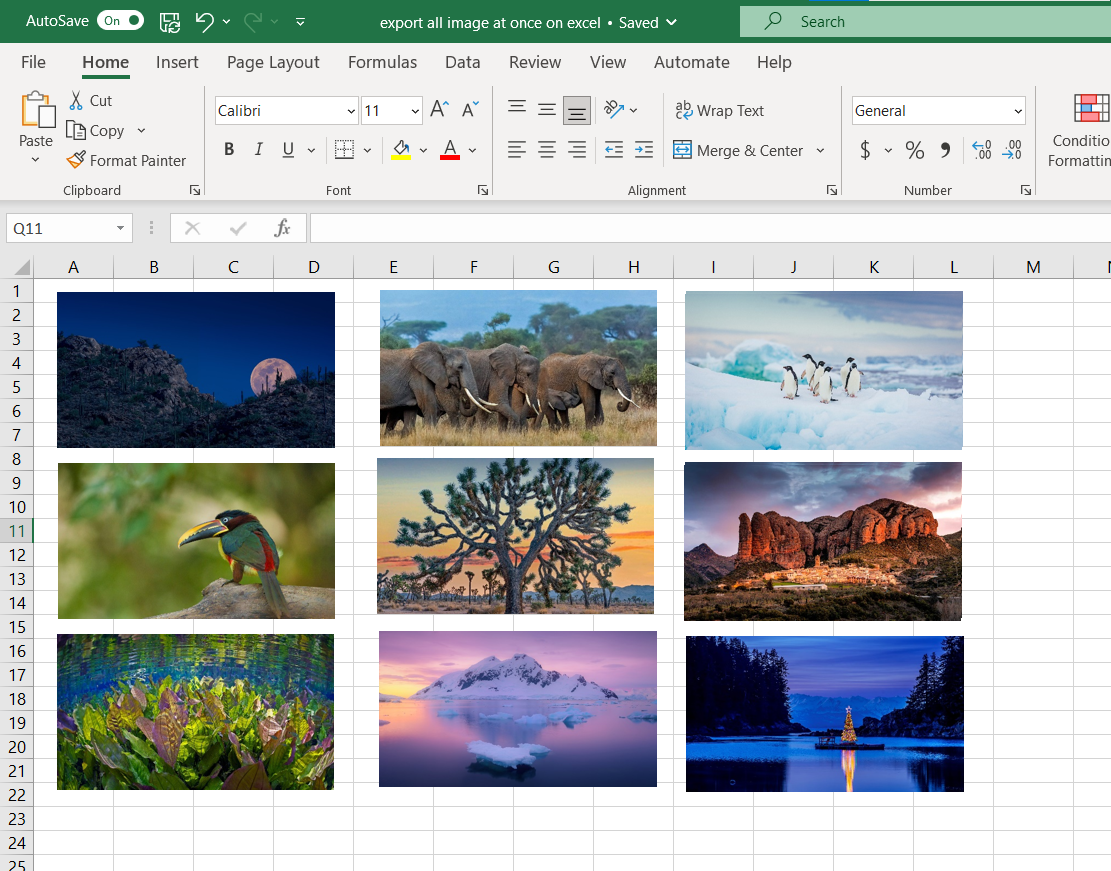
For example, an excel file contains a lot of pictures


As the title of the article "Is it possible? Export all images at once on Excel file" - The answer is YES!

Please read and memorize this trick. The steps are as below.


➠ Follow & send us a message on QTitHow for answers to IT issues.


How to do:

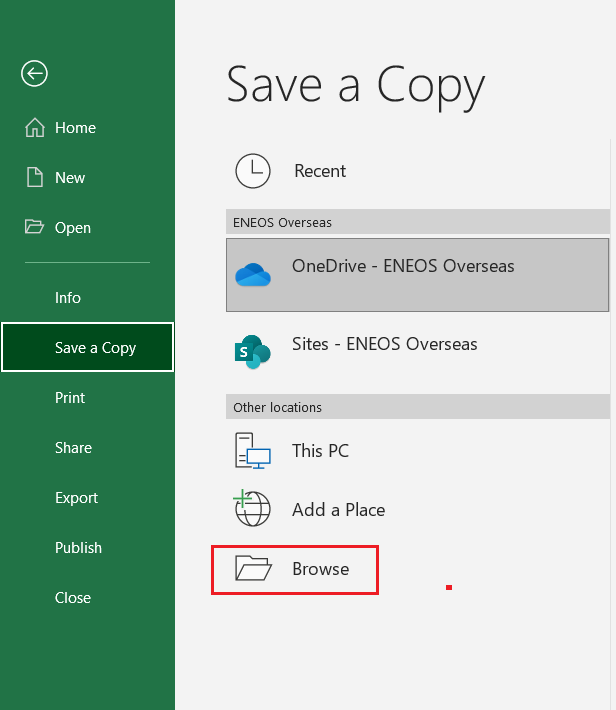
Step 1: Click File > Save as


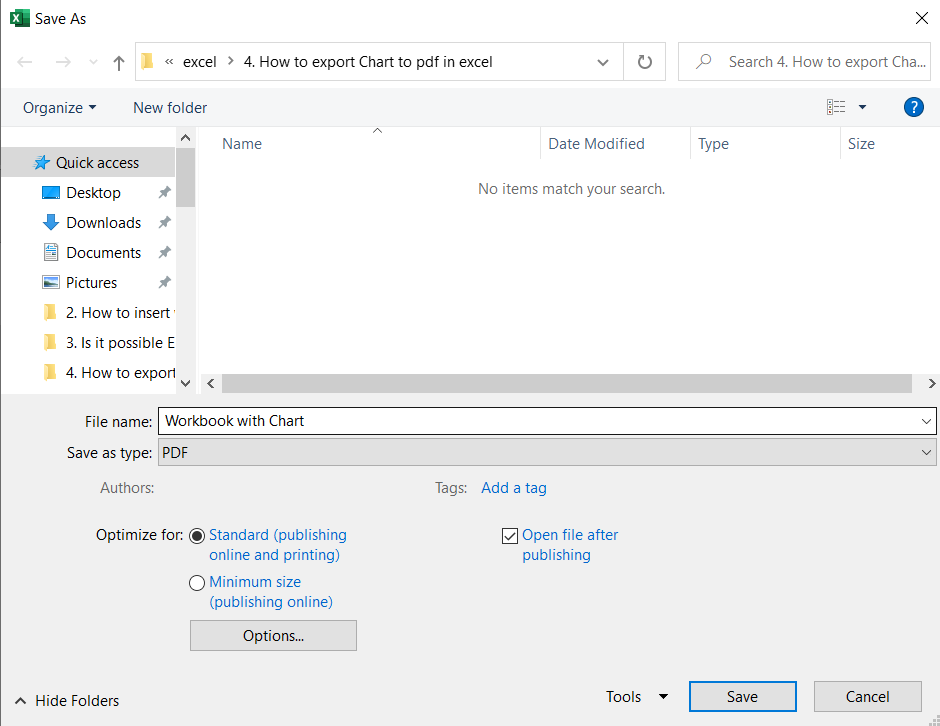
Step 2: Select Browse to save the Excel file. A window will appear, do the following:

  • Select location to save
  • Set name the File name
  • In the Save as type section, select Web page. Selecting Web page will help you save all the images on that Excel file in a separate folder.


Step 3: Click Save button. In the popping up Microsoft Excel dialog box, click the Yes button.


And this is the result:

All of images in Excel file will save at image_files folder

Conclusion

Too fast, too easy, right? With only 3 simple steps, this trick helps you to save all images on Excel file quickly and without leaving any image.


Maybe you are interested?


How to Move/Copy Worksheet to another Workbook

On


Today I will share an Excel trick that you will use often in work and study: How to copy Worksheet from 1 Workbook to another Workbook?

The important thing here is that you will have to copy the entire content and format of that WorkSheet to another Workbook: data, date format, columns, rows, colors... See detailed instructions below.


➠ Follow & send us a message on QTitHow for answers to IT issues.


How to do:


Step 1: Open all the Workbook that you will be working on.

Step 2: On the Workbook containing the Sheet you want to copy, right-click on that Sheet and select Move or Copy...


Step 3: In the To book section, select the Workbook you want to copy to. As in this example, there are 3 choices as follows:

  • New book: Excel will automatically create a new Workbook and will copy it to this new Workbook.
  • Workbook 1: It will create 1 more Sheet like Sheet 1 at Workbook 1 (this case is like you duplicate 1 sheet at 1 workbook so).
  • Workbook 2: This is the Workbook you have already opened, it will copy Sheet 1 to Workbook 2 (This is the most commonly used option).


Step 4: In the Before sheet section, you can choose where the Sheet will be copied on the Workbook.

You can completely specify which Sheet it is in front of you want. Normally, we would choose (move to end). To easily find the Sheet that we just copied.


Step 5: Click Create a copy. After that click OK to complete.


Important Note:

  • You must open all workbook that you will work with, including the workbook containing needed worksheets, and the workbook you will insert the worksheets to. Otherwise, you will not find out the workbook names in Step 3.
  • You must check the Create a copy option in Move or Copy dialog box, otherwise you will move the selected worksheet out of original workbook.

Conclusion: 
With this trick, you can copy any sheet to any Excel - Workbook file you want. Very useful, right?

How to Import data into the Excel file from a Text file or CSV file

On


Hello everyone, this article will be the first in a series of essential Excel tips (often used in study and work). Hope everyone will always follow and support QTitHow.

In many cases you need to import data into the Excel file from a text file or from a CSV file.

In fact, the data you receive is in a simple text file, and your wish is to convert that text file into an Excel file (with rows and columns) for you to easily manage and use. This article will guide you to do that.


➠ Follow & send us a message on QTitHow for answers to IT issues.


How to do:

Step 1: Open a new Excel file (new Workbook). Switch to the Data tab, select From Text/CSV.


Step 2: A window will appear, please select the existing text file > Click Import (or double click on the selected file). The data on your text file will be displayed as below.


Step 3: Next step, choose Delimiter to match the content of your text file. Commonly used delimiters: colon - ":", comma - ",", equal sign "=", semi colon - ";"...

For example, in this case, the data fields are separated by semicolons.


Step 4: Click Load to import the data into the Excel file. This is the result.


The data on the excel file after being imported from the text file will be in Table format.

Some more features explained:

  • You can define your own delimiter and choose Custom to import the data.
  • Refresh feature: restore all original values, including delimiter entries.
  • Transform feature: Used to adjust some information before you perform step 4. Adjustments such as rows, columns, data,...

Use Transform feature to adjust rows, column, data...

Attention:

  • The data on the excel file after being imported from the text file will be in Table format.
  • You can import data from a CSV file (Excel sheet). The method is similar to the text file.

Conclusion:
The above are just extremely basic instructions when you want to import data into an Excel file from a Text or CSV file. If you have any questions please leave a comment below. Thank you!

Contact Microsoft Support by Phone number

In addition to asking questions on the forums to get support from Microsoft, you can contact them directly via phone number.
Microsoft has branches and support worldwide. They are ready to assist you 24/7.

Please visit the following link to be able to contact Global custom Service phone numbers immediately: Contact Microsoft Support by Phone number


Note: Please select the correct area where you live and work to receive the best support from Microsoft.


Rescue Excel file with Error: “Excel cannot open the file because the file format or file extension is not valid”

You cannot open the Excel file and receive the following error message:
"Excel cannot open the file 'filename.xlsx' because the file format or file extension is not valid. Verify that the file has not been corrupted and that the file extension matches the format of the file."

Error Message when open Excel file

Note that this is a method specific to the above error message.


How to do:

Fix "Excel cannot open the file because the file format or file extension is not valid"


Step 1: Find the corrupt Excel file, press F2 or right-click and choose Rename. Then change the file extension from .xlsx to .xls (tif he file extension is hidden, go to Folder Options to show the file extension).

Change to .xls 


Step 2: After that open Excel file (.xls). You should now be able to open the normal Excel file.
However, for safety and better use, please convert the file extension from.xls to .xlsx again.


Step 3: Click File, then choose Convert to convert .xlsx. Click OK and Yes to agree to convert.

Convert function 

Excel file has been fixed and converted to its original format (.xlsx)

Done, now you can reopen the Excel file (.xlsx) to use it.


Conclusion:
This is an extremely fast method to handle the error in Excel: “because the file format or file extension is not valid”.
I'm not 100% sure this method solved. But if this doesn't work, you can comment below, I will help you.

In addition, if you have any problems with your computer, please contact us directly through the QTitHow fanpage. We will try to help and answer you as soon as possible. Thank you!

Tags: because the file format or file extension is not valid, Excel cannot open the file because the file format or file extension is not valid, the file format or file extension is not valid, excel cannot open because the file format, excel cannot open the file because the file format or extension is not valid, fix excel cannot open the file because the extension is not valid, excel cannot open the file format is not valid, excel cannot open the file '(filename)'.xlsx' because the file format, excel cannot open the file corrupted 

Maybe you are interested?

Fixed Name Conflict In Excel


Introduction:
When you use "Move and copy" function to  copy Sheet on Excel file. You receive a message from Microsoft Excel with content as below:
"A formula or sheet you want to move or copy contains the name "file name", which already exists on the destination worksheet.  Do you want to use this version of the name?
To use the name as defined in the destination sheet, click yes. To rename the range referred to in the formula or worksheet, click no, and enter a new name in the Nme Confilct dialog box."


When you choose "Yes", this message is still not lost. When you choose "No", a message windows with name "Name Conflict" that will aprrears:
"Name already exists on destination sheet.
Old Name:...
New name:...
"


You can not close this Name Conflict message, even if you fill any information at "Old name" & "New name" cell or choose Cancel.
This is a classic error in Excel. When this is the case, you can not open, modify & close to any Excel file.
Don't worry, QTit will help you fix this error with some basic step.

You can see video guide for fix error: Name conflict in Excel


How to Do:
Step 1: The first, you turn off this message by: Mouse right Taskbar > Task Manager > Process tab > Right mouse Microsoft Excel > End task.


Note that all Excel files you have open will be exit after Step 1 is done.


Step 2: Install and open the program XLStyles Tool (this program is only supported on Windows 10)


Step 3: Click Get File > find and select the path of the corrupted Excel file > select Remove All in Name Ranges With External References > Process File


Step 4:
Open the corrupted Excel file. Select the Formulas tab > Name Manager.


Step 5: Select all values in the Name Manager table. and Delete (delete them).


Step 6: Completed. Please open the error excel file and check it. I'm 100% successful for sure.
So you already fixed error: Name Conflict In Excel

Conclusion:

This is a general formula that QTit has learned from experience to fix this classic Name Conflict error in Excel. Thank you for reading QTit's article.

In addition, if you have any problems with your computer, please contact us directly through the QTitHow fanpage. We will try to help and answer you as soon as possible. Thank you!

Maybe you are interested?

Copyright © 2016 QTitHow All Rights Reserved