AI News

  • Loading...
Browsing Category " Tips "

Save Table as Image Excel with Just 3 Simple Steps

On


This is a skill in Excel that you should have. It is highly applicable in your daily work.

Here are 3 simple steps, keep in mind and put them into practice.


➠ Follow & send us a message on QTitHow for answers to IT issues.


How to do:

Step 1: Select the data area in the Table that you want to save. Select Copy > Copy as Picture


Copy the data area in the Table


Step 2: A window will appear - Copy Picture, keep the default settings and press OK


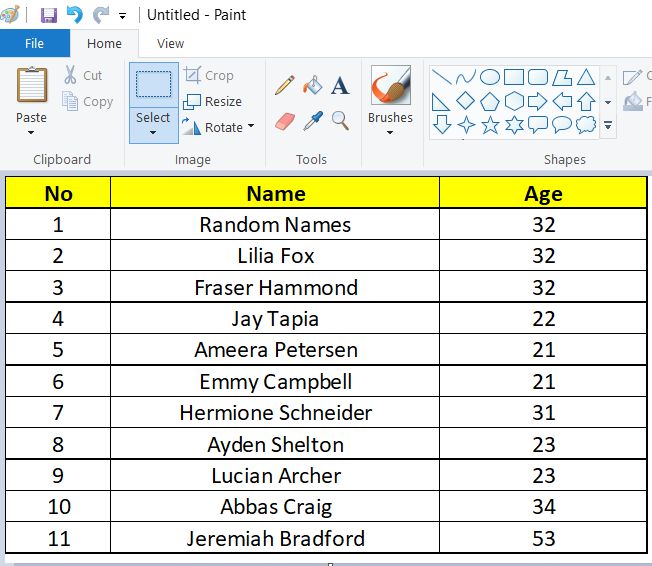
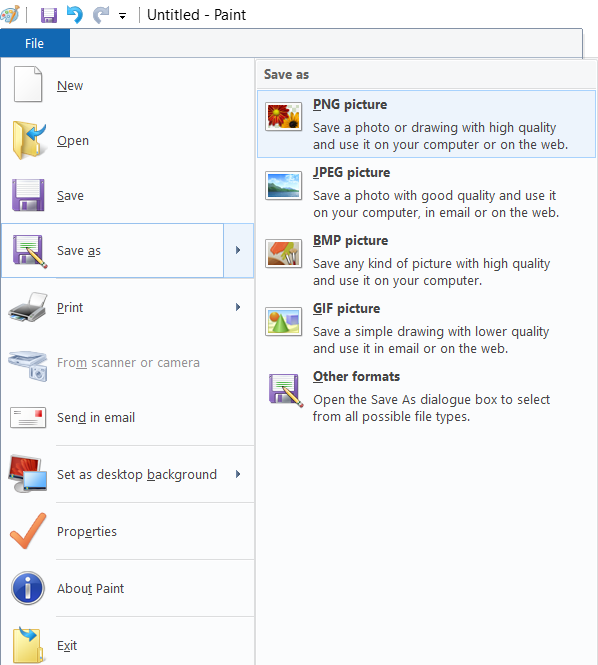
Step 3: Open the Paint program in Windows. Then Paste directly into Paint. Finally, adjust the length and width to suit and save it as an image file (PNG or JPG).


Paint program on Windows


Save as PNG or JPG


In addition to being able to save as an image file as above (in step number 3), you can Paste it directly into Email on Outlook, Word, Power Point... (data after Paste will be in the form of an image).


Conclusion:

With the above 3 steps, you can process data on Excel much more flexibly. Thank you for following the article.

Export Graph/Chart from Excel to PDF

On


Have you ever had a situation where you have to save all charts or graphs on an Excel report file to a PDF file (not including the content/text on the file)? I have already met.

In many cases you just want to display loud and clear charts/graphs to view and compare them. This article is the solution for you. In this tutorial I will guide you in 2 parts:


Part 1: Save/Export one chart/graph from excel to PDF file
Part 2: Save/Export multiple charts/graphs from Excel to PDF file.

(Note: Before doing this please back up the original excel file.)


➠ Follow & send us a message on QTitHow for answers to IT issues.


How to do:


Part 1: Instructions to save/export one chart/graph from Excel to PDF

Step 1: Right-click on an empty area on the chart/graph in the Excel file which you want to export it.

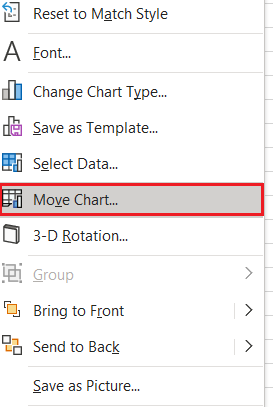
Step 2: Select Move Chart... A Move Chart window appears, click New sheet. Then press OK.


Move chart function on Excel


Click New sheet

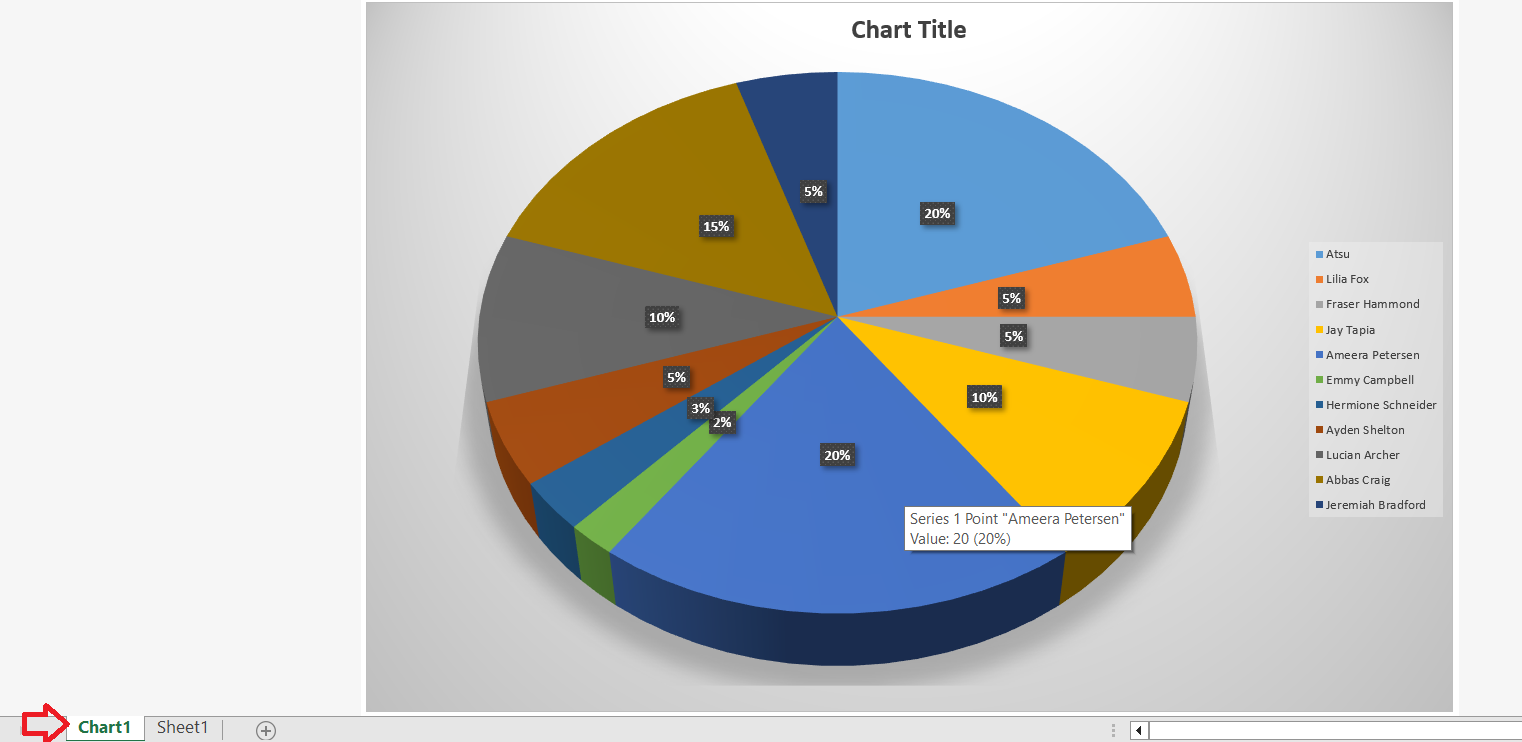
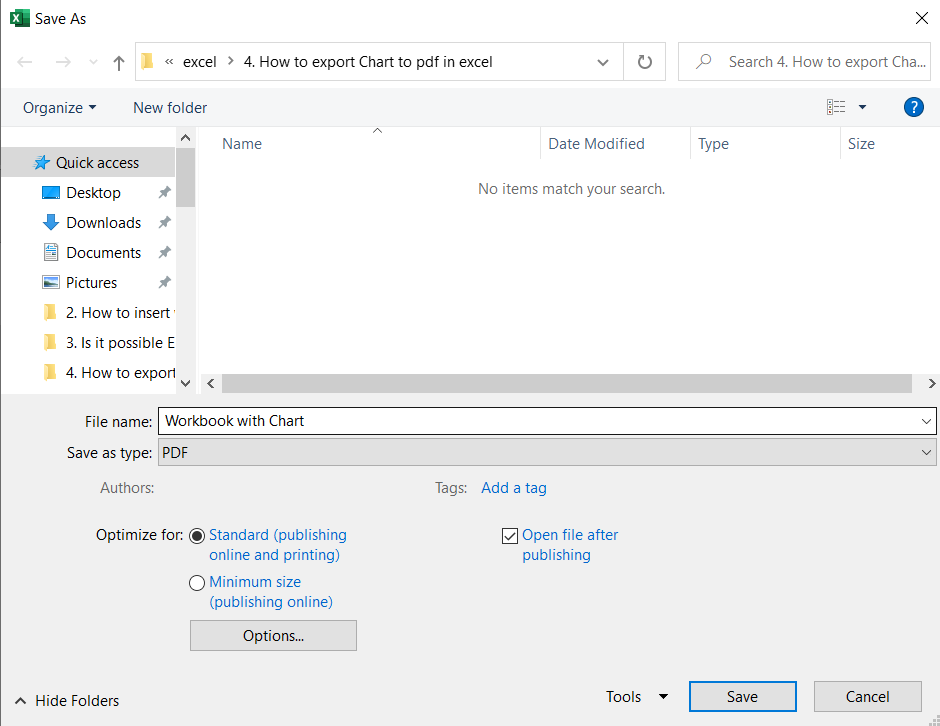
Step 3: Now the selected chart will be transferred to a new sheet named Chart 1. Next, click File > Save as (Save a copy) > Save as type = "PDF".


One new sheet "Chart 1" be created


Save as type to PDF

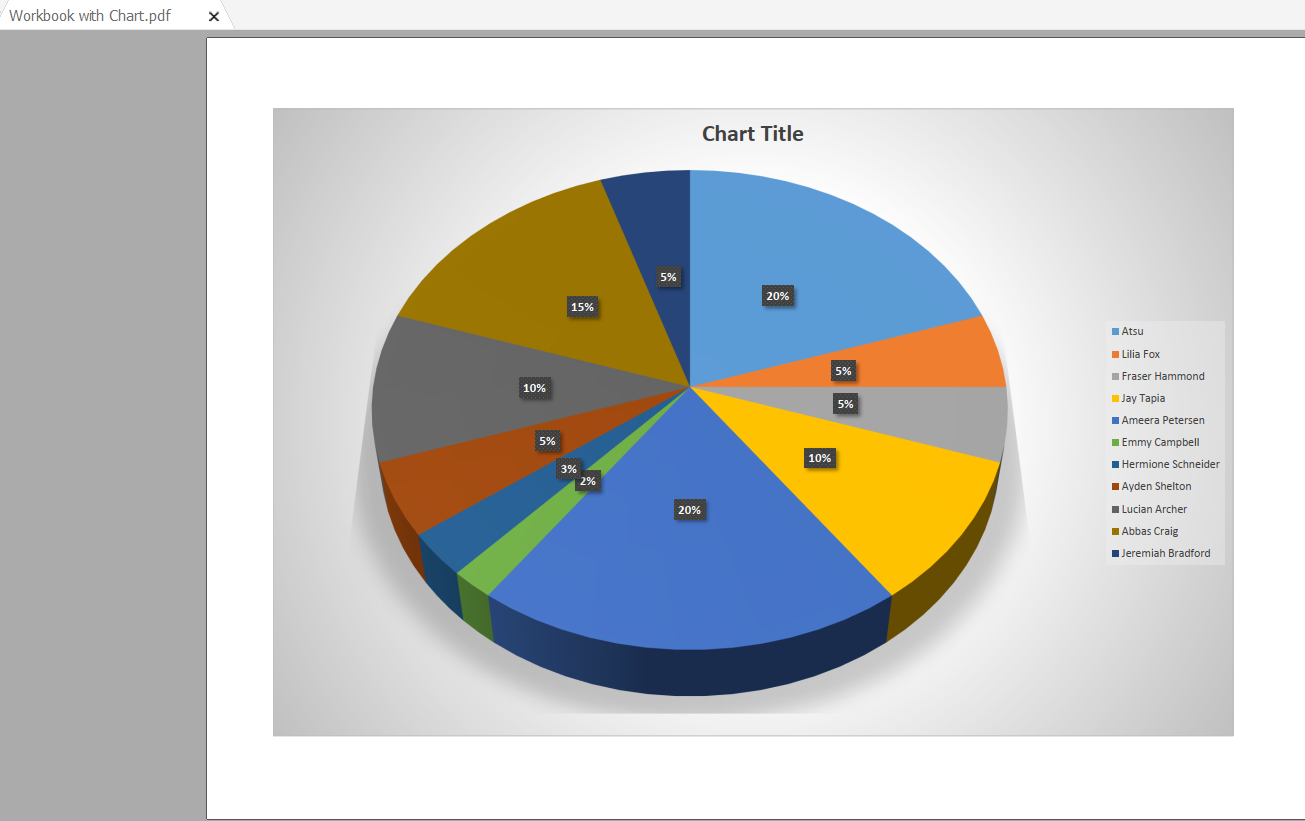
Done, you have finished exporting or separately saving a desired chart/graph from an Excel file to a PDF file.


Results:  save/export one chart/graph from Excel to PDF


Part 2: Instructions to save/export multiple charts/graphs from Excel to PDF

Step 1: Please do steps 1 & 2 (of part 1) for all the charts you want to export to PDF file.

Step 2: Click to select all the newly created sheet charts (in the example below choose: chart 1, chart 2).

  1. To select multiple adjacent chart sheets in the Sheet bar, please hold the Shift key and click the first chart sheet and the last chart sheet;
  2. To select multiple non adjacent chart sheets in the Sheet tab bar, please hold the Ctrl key and click each chart sheet one by one.


Step 3: Same as step 3 of part 1.

Done, now all charts/graphs have been saved on the PDF file.


Results: save/export multiple charts/graphs from Excel to PDF

Conclusion:

This trick is pretty cool, isn't it, it helps you to export charts/graphs to a pdf file with a large size and very clear display (without text).


Maybe you are interested?
Is it possible? Export all images at once on Excel file

On


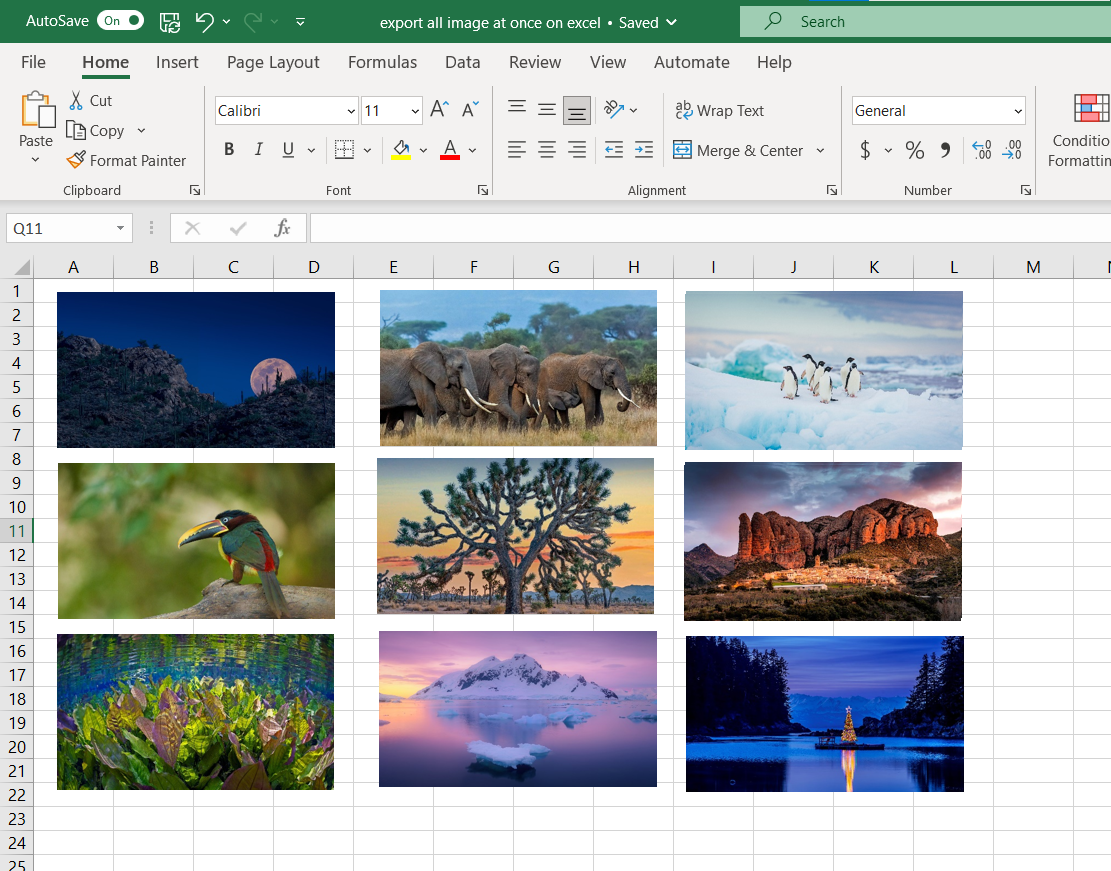
The usual way you save images from an Excel file is to use the Save as copy feature on Excel, is that correct?

However, in case an Excel file has a lot of images and you want to save all those image files in one folder. So what do you have to do to be the best? If you use the Save as copy method one by one, it will take a lot of time and difficulty.


For example, an excel file contains a lot of pictures


As the title of the article "Is it possible? Export all images at once on Excel file" - The answer is YES!

Please read and memorize this trick. The steps are as below.


➠ Follow & send us a message on QTitHow for answers to IT issues.


How to do:

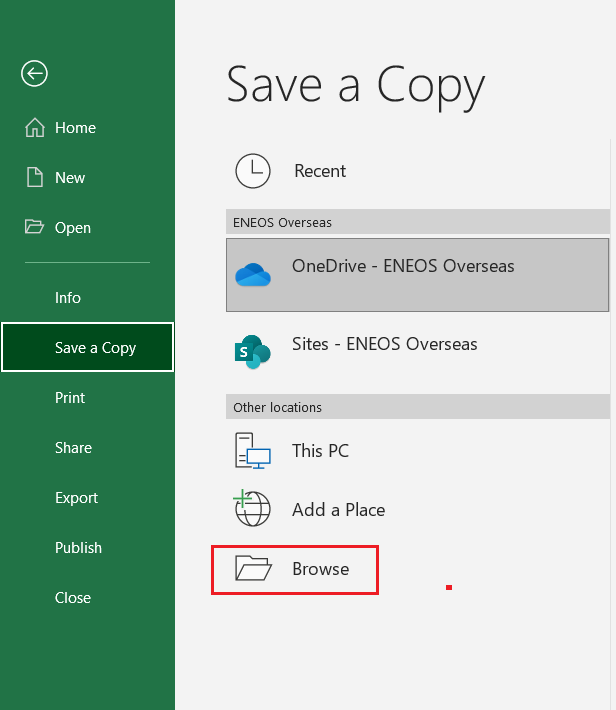
Step 1: Click File > Save as


Step 2: Select Browse to save the Excel file. A window will appear, do the following:

  • Select location to save
  • Set name the File name
  • In the Save as type section, select Web page. Selecting Web page will help you save all the images on that Excel file in a separate folder.


Step 3: Click Save button. In the popping up Microsoft Excel dialog box, click the Yes button.


And this is the result:

All of images in Excel file will save at image_files folder

Conclusion

Too fast, too easy, right? With only 3 simple steps, this trick helps you to save all images on Excel file quickly and without leaving any image.


Maybe you are interested?

How to Move/Copy Worksheet to another Workbook

On


Today I will share an Excel trick that you will use often in work and study: How to copy Worksheet from 1 Workbook to another Workbook?

The important thing here is that you will have to copy the entire content and format of that WorkSheet to another Workbook: data, date format, columns, rows, colors... See detailed instructions below.


➠ Follow & send us a message on QTitHow for answers to IT issues.


How to do:


Step 1: Open all the Workbook that you will be working on.

Step 2: On the Workbook containing the Sheet you want to copy, right-click on that Sheet and select Move or Copy...


Step 3: In the To book section, select the Workbook you want to copy to. As in this example, there are 3 choices as follows:

  • New book: Excel will automatically create a new Workbook and will copy it to this new Workbook.
  • Workbook 1: It will create 1 more Sheet like Sheet 1 at Workbook 1 (this case is like you duplicate 1 sheet at 1 workbook so).
  • Workbook 2: This is the Workbook you have already opened, it will copy Sheet 1 to Workbook 2 (This is the most commonly used option).


Step 4: In the Before sheet section, you can choose where the Sheet will be copied on the Workbook.

You can completely specify which Sheet it is in front of you want. Normally, we would choose (move to end). To easily find the Sheet that we just copied.


Step 5: Click Create a copy. After that click OK to complete.


Important Note:

  • You must open all workbook that you will work with, including the workbook containing needed worksheets, and the workbook you will insert the worksheets to. Otherwise, you will not find out the workbook names in Step 3.
  • You must check the Create a copy option in Move or Copy dialog box, otherwise you will move the selected worksheet out of original workbook.

Conclusion: 
With this trick, you can copy any sheet to any Excel - Workbook file you want. Very useful, right?

How to Import data into the Excel file from a Text file or CSV file

On


Hello everyone, this article will be the first in a series of essential Excel tips (often used in study and work). Hope everyone will always follow and support QTitHow.

In many cases you need to import data into the Excel file from a text file or from a CSV file.

In fact, the data you receive is in a simple text file, and your wish is to convert that text file into an Excel file (with rows and columns) for you to easily manage and use. This article will guide you to do that.


➠ Follow & send us a message on QTitHow for answers to IT issues.


How to do:

Step 1: Open a new Excel file (new Workbook). Switch to the Data tab, select From Text/CSV.


Step 2: A window will appear, please select the existing text file > Click Import (or double click on the selected file). The data on your text file will be displayed as below.


Step 3: Next step, choose Delimiter to match the content of your text file. Commonly used delimiters: colon - ":", comma - ",", equal sign "=", semi colon - ";"...

For example, in this case, the data fields are separated by semicolons.


Step 4: Click Load to import the data into the Excel file. This is the result.


The data on the excel file after being imported from the text file will be in Table format.

Some more features explained:

  • You can define your own delimiter and choose Custom to import the data.
  • Refresh feature: restore all original values, including delimiter entries.
  • Transform feature: Used to adjust some information before you perform step 4. Adjustments such as rows, columns, data,...

Use Transform feature to adjust rows, column, data...

Attention:

  • The data on the excel file after being imported from the text file will be in Table format.
  • You can import data from a CSV file (Excel sheet). The method is similar to the text file.

Conclusion:
The above are just extremely basic instructions when you want to import data into an Excel file from a Text or CSV file. If you have any questions please leave a comment below. Thank you!

Tips for Windows 11: How to show Weather Widget on Taskbar


Unlike Windows 10, Windows 11 currently does not have News and Interests functionality. This is an interesting and useful feature for users on Windows 10.
However, with Windows 11 you will not see this feature anymore. Instead are Weather, News, Top Stories... located in the Widget. This article will help you display the Weather feature on Windows 11 with just a few basic steps.


How to do:

To display the Weather feature on the Taskbar, please install the Taskbar in the middle of the screen as the default below. If the Taskbar is on the left side of the screen. Please reinstall it.  


How to move Taskbar & Start Menu to the left or center in Windows 11


Make sure the taskbar is installed at the center of the screen.


Step 1: Right click to Taskbar. Choose Taskbar settings.


Step 2: Go to Personalization on the left side, and then find to Taskbar items.

Step 3: Please turn on Widgets. Please wait 1-2 mintutes to system to update Weather widget on left corner side.


Turn on Widgets


 Weather info will be display on the left side of Taskbar

Conclusion:

With 3 simple steps, you can enable or disable the Weather feature as you like. If this post help to you, please like and share it. Thank you.

How to move Taskbar & Start Menu to the left or center in Windows 11


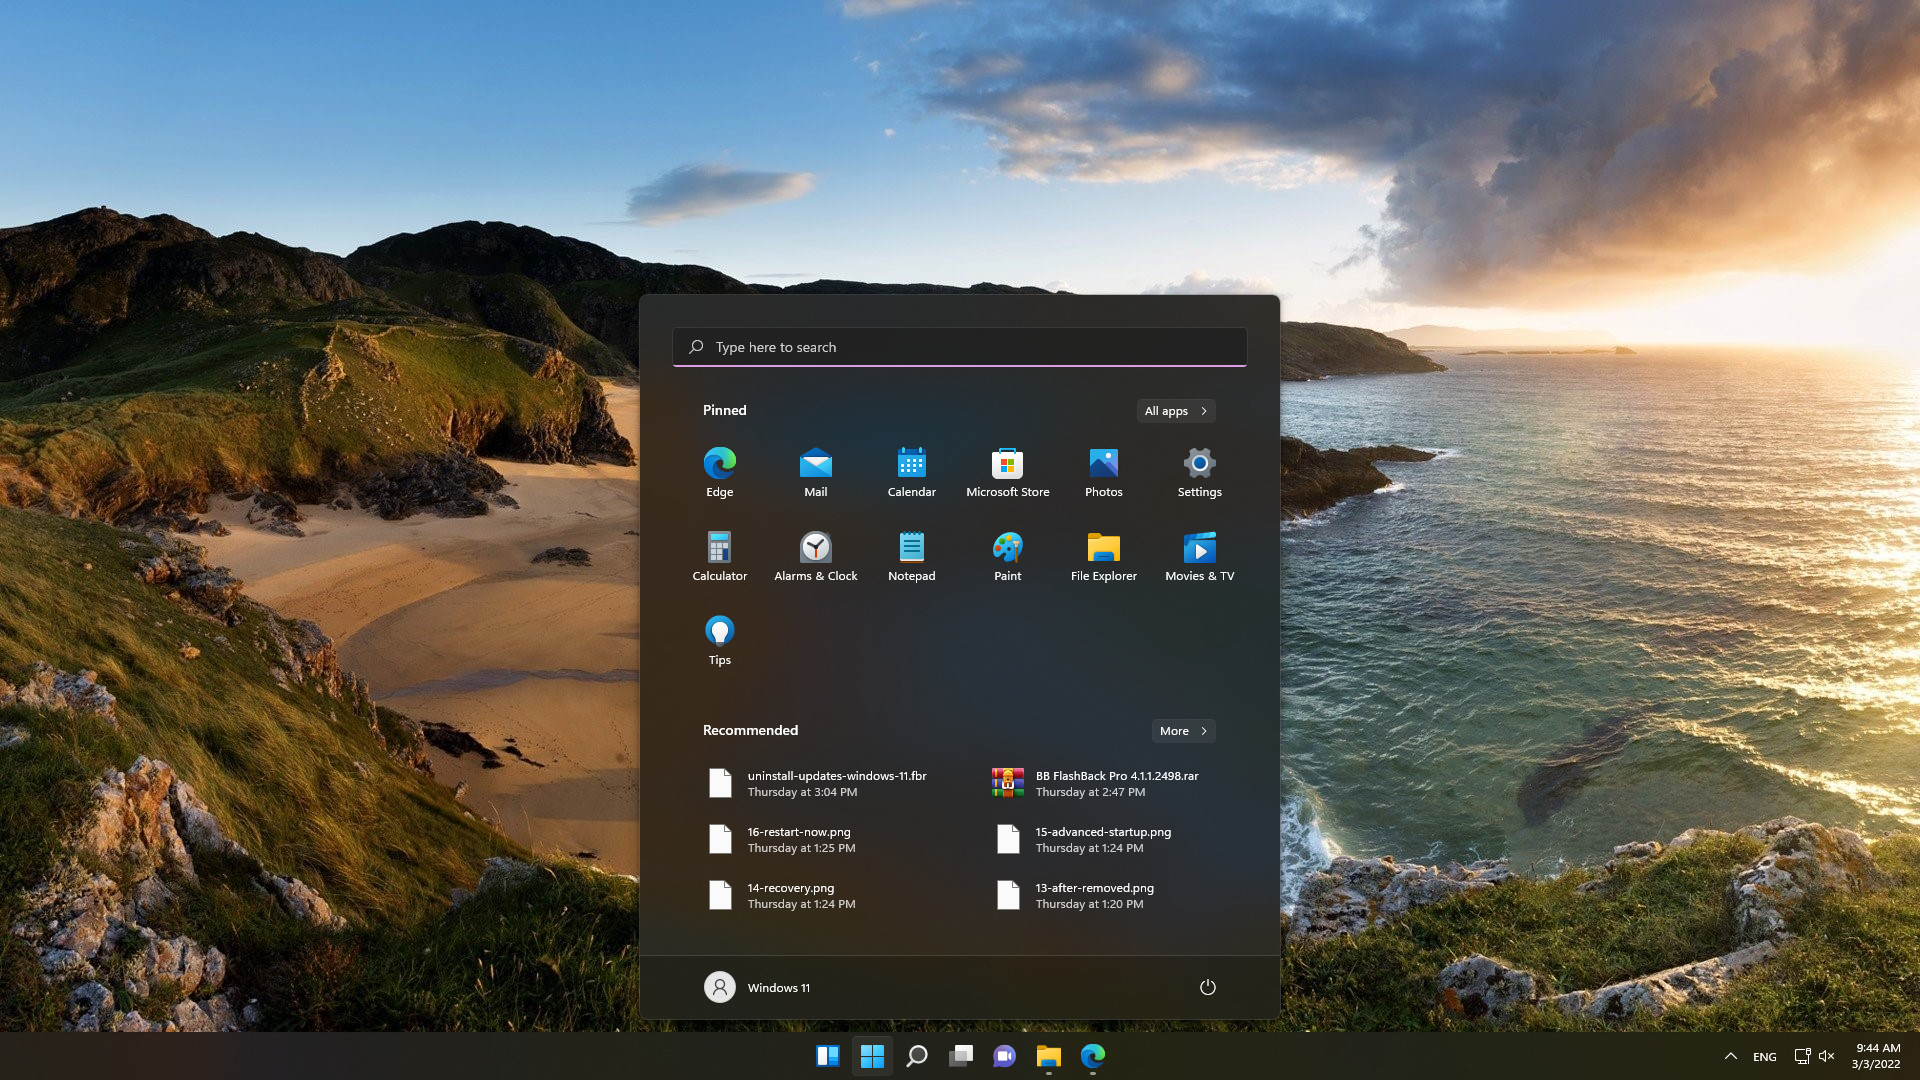
The biggest difference between Windows 11 and Windows 10 is the location of the Taskbar and Start Menu. For Windows 11, the default location will be in the center of the screen where your eyes tend to go on your display. However, you can still adjust their position to the left like Windows 10. This post help to you do it.


How to remove "Transparent box" on Taskbar

3 Outstanding improvements in KB5010414 update on Windows 11 


By default, the Taskbar is in the middle of the screen


How to do:

Step 1: Right click Taskbar


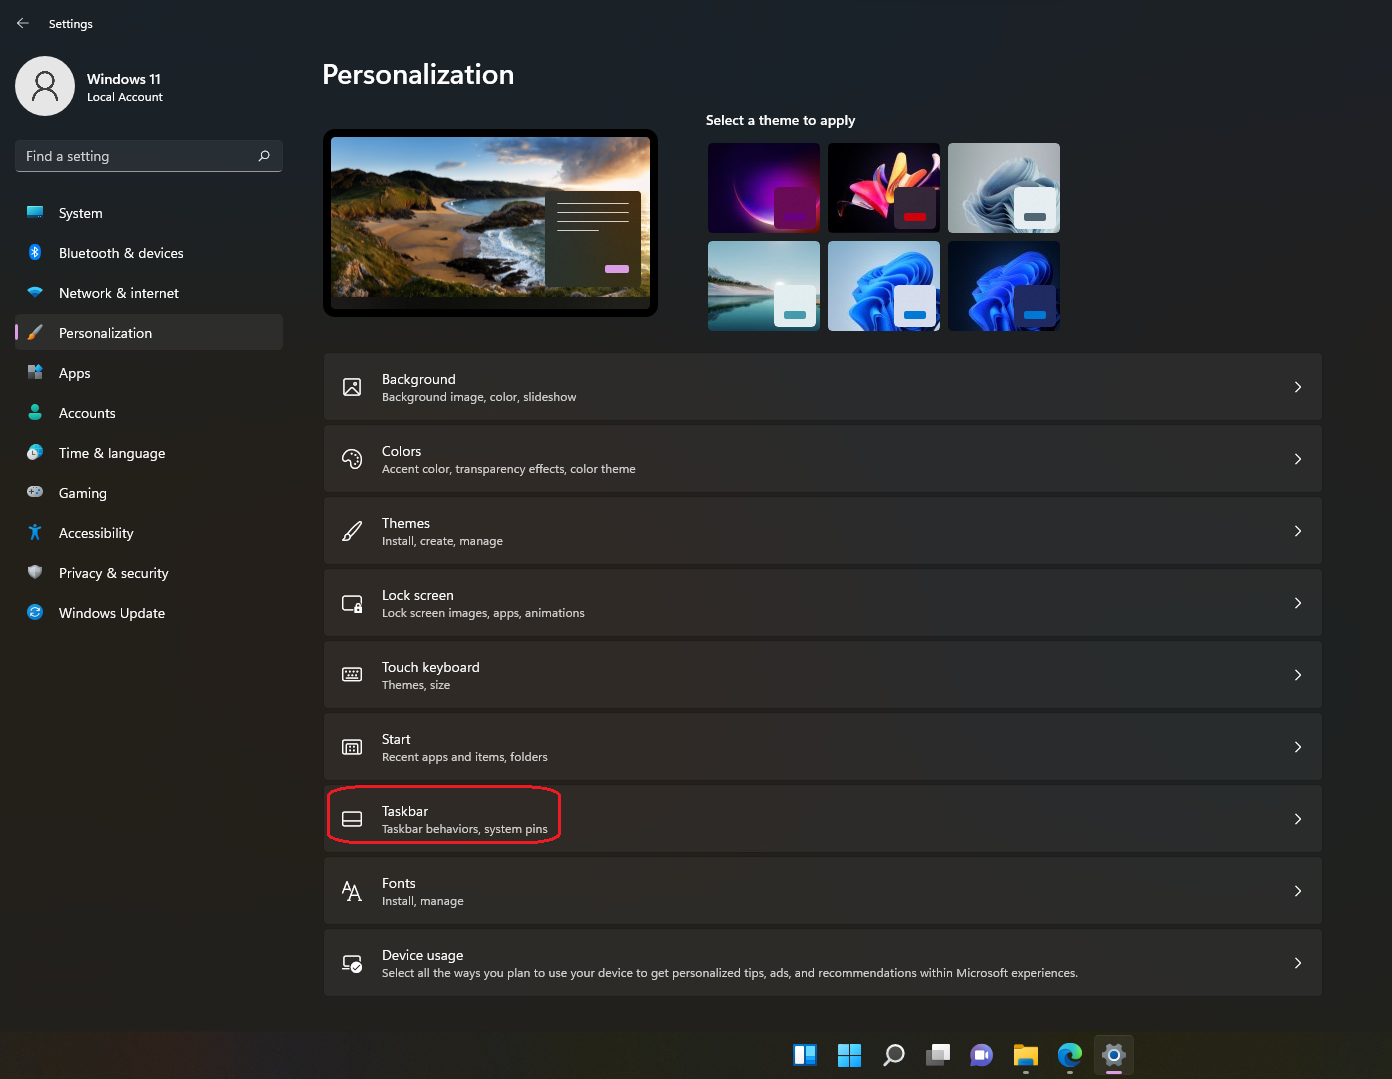
Step 2: Go to Personalization category on righ side. Click to Taskbar 


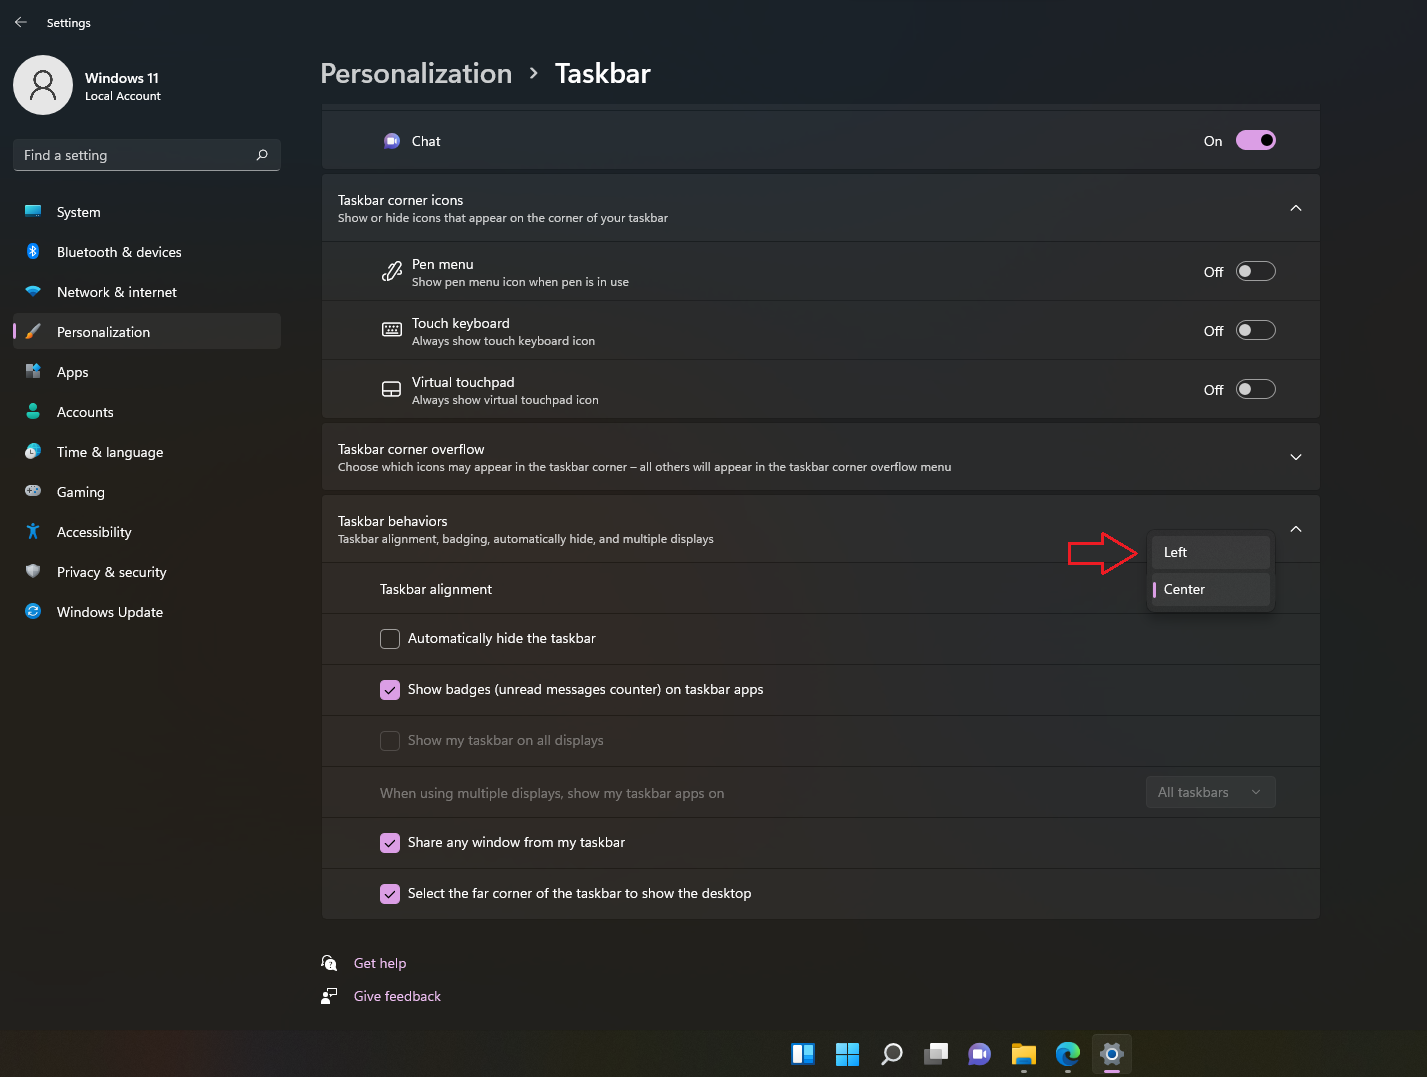
Step 3: Find to Taskbar behaviors category. From here, look for Taskbar Alignment. Please choose Left


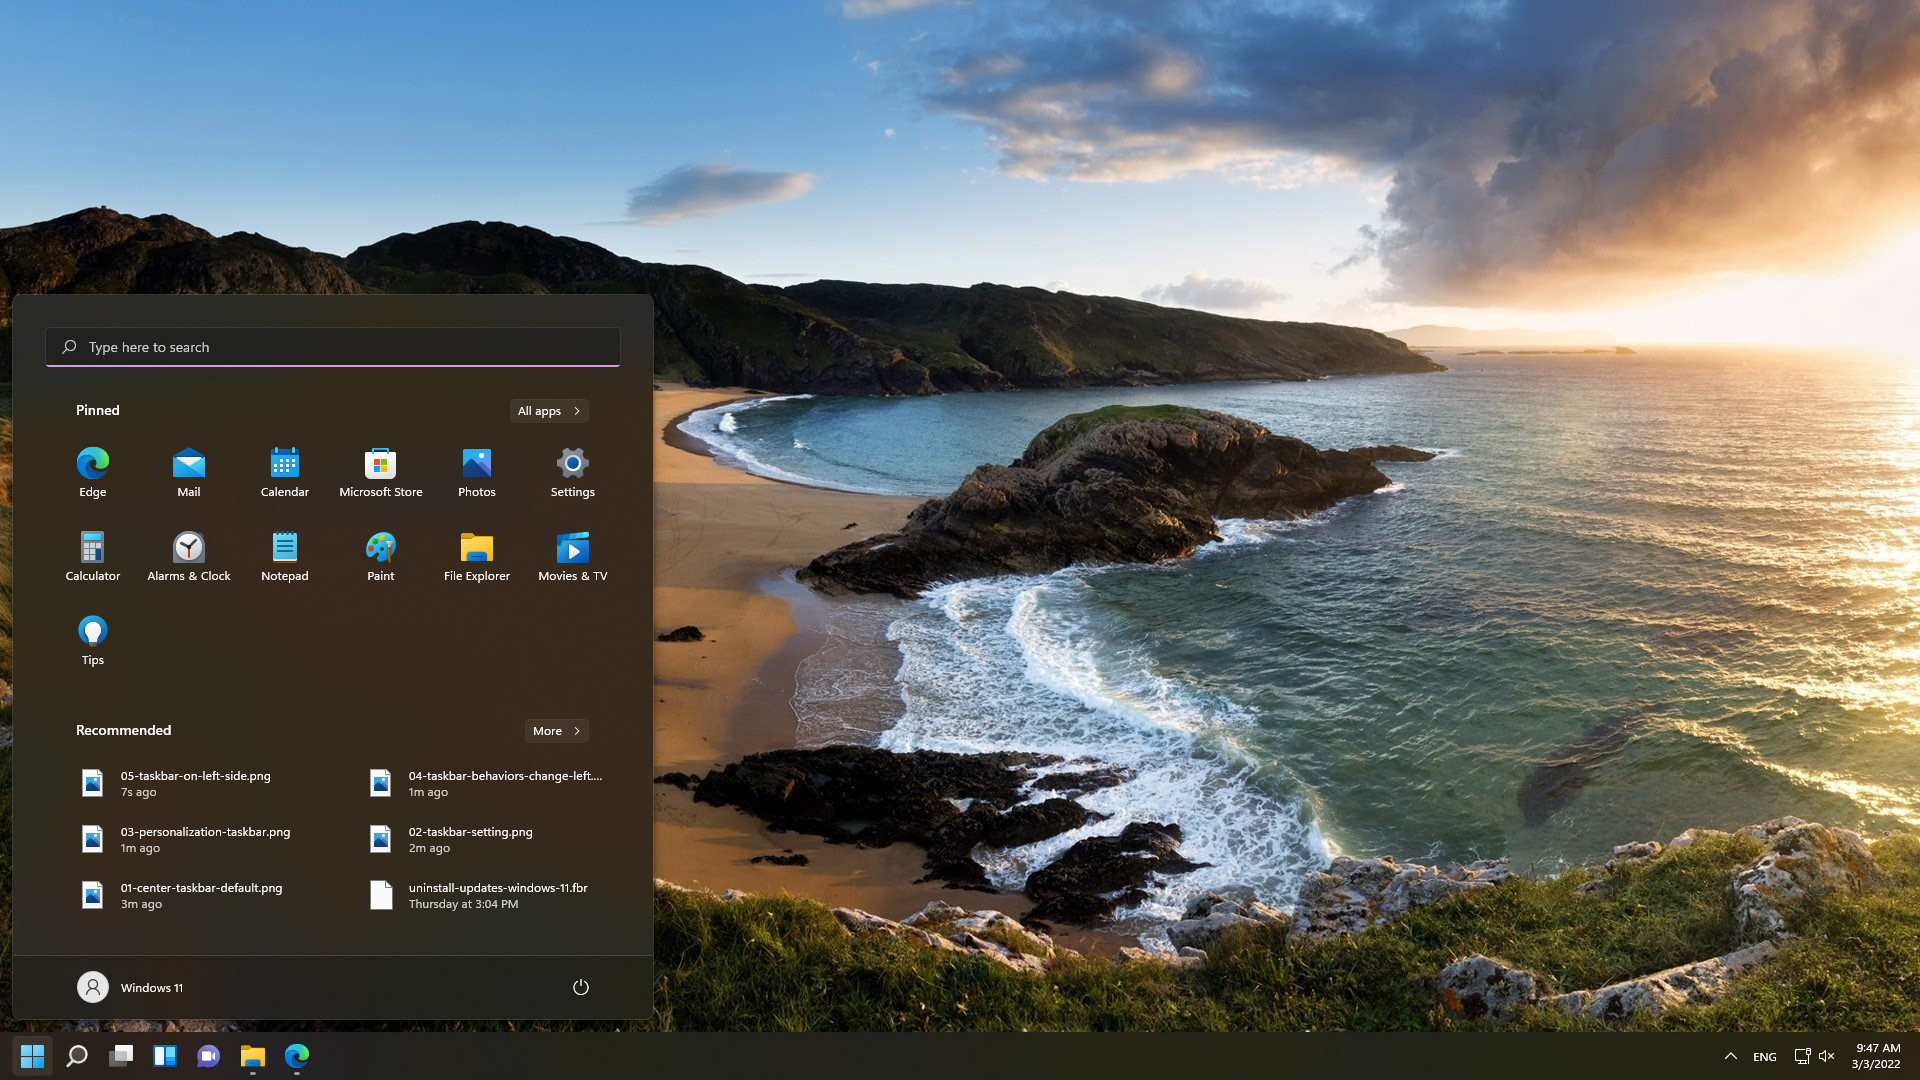
Finished. Now, Taskbar and Start Menu move the left side. 


Taskbar & Start Menu on the left side (same as Windows 10)


Note: When you move the Taskbar and Start Menu to the left, the Weather widget feature will disappear on Taskbar as normal. And if you want to show Weather, please move it on the center.


How to show Weather Widget on Taskbar


Conclusion:

This is 3 steps help to you move Taskbar & Start Menu to the left in Windows 11. If have any question, please contact me by fanpage QTitHow. Thank you.

How to remove "Transparent box" bugs on Windows 11


When you work on PC or playing something on Windows 11, this randomly appears. No corrupt files, no virus. Just a weird but annoying bug.

That is a transparent box opens and cannot close it. Causing this display region not to be accessible with the mouse, closing the process causes it to restart and the problem is solved.
Beside, when you move my cursor to this box it's starts showing a loading icon. 


A "Transparent box" showing above Taskbar


How to do:

And This is  a temporary solution help to you remove Transparent box on Taskbar Windows 11

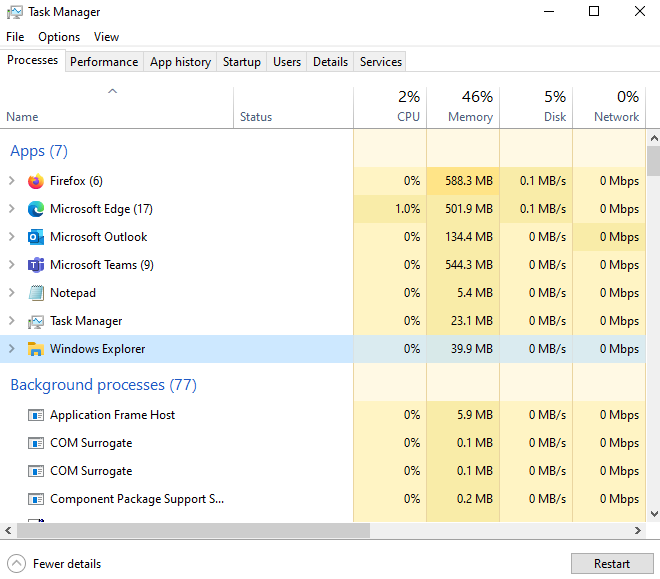
Step 1: Open Task Manager (or Windows + Shift + Esc), go to Process tab  


Useful Keyboard Shortcuts for Windows 11


Step 2: Then scroll down and find Windows Explorer running.
Step 3: Please Restart it.


Restart to Windows Explorer


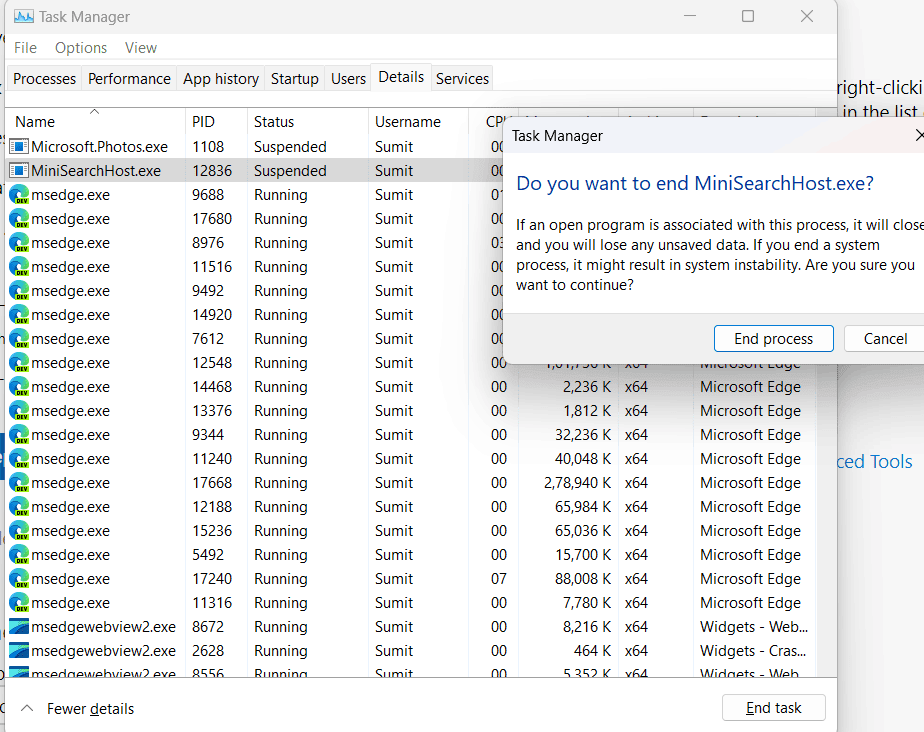
Step 4: Still on Task Manager, move to Details tab.
Step 5: Find and disbale MiniSearchHost.exe


Right click and choose End task


Finished. In addition, try reinstalling Windows 11 and update to the latest version to completely fix the above error. 

KB5010414 - Outstanding improvements update on Windows 11 

Copyright © 2016 QTitHow All Rights Reserved