AI News

  • Loading...

5 AI Prompts That Free Up 5 Hours of Office Work Every Week

On
5 AI Prompts That Free Up 5 Hours of Office Work Every Week

Here's what nobody tells you when you start learning AI: the biggest wins don't come from flashy tech. They don't come from building complex applications or automating entire enterprise systems. The real, immediate payoff of AI lives in the tedious, repetitive stuff you slog through every single week—the tasks that silently drain 30 minutes here, an hour there, until you look up and half your workday has evaporated.

AI hits hardest right where it matters most: tackling those small, time-consuming tasks. This week alone, you could completely hand off five of your biggest time-killers to AI. Here's how.

5 Office Tasks to Delegate to AI—Starting Today

[ SUMMARIZE EMAILS/DOCUMENTS ] ➔ Save ~45 minutes/week
[ DRAFT FIRST VERSIONS ] ➔ Save ~1 hour/week
[ PREP FOR MEETINGS ] ➔ Save ~30 minutes/week
[ RESPOND TO REPETITIVE MESSAGES ] ➔ Save ~45 minutes/week
[ PROCESS MEETING NOTES ] ➔ Save ~30 minutes/week

Task 1: Summarize Long Emails or Documents

Time saved: ~45 minutes/week.

The reality: Most people read every single word of every email thread and report that lands in their inbox. You don't have to.

Sample prompt:

Summarize [this email thread / document / report] into 5 bullet points. Tell me:
- What's the main point
- What decision or action do I need to take
- Any deadlines mentioned
- Who else is involved
- Anything I should flag or follow up on

[Paste your content here]

Drop this into ChatGPT, Claude, or whatever AI you're using. You'll have your answer in 10 seconds.

time-saving tip with ChatGPT

Task 2: Generate First Drafts for Any Document

Time saved: ~1 hour/week.

The reality: When you need to write a report, status update, proposal, or summary, most people stare at a blank screen for 20 minutes before typing a single word.

Sample prompt:

Write a first draft of [what you need to write] for [target audience].
Context: [2-3 sentences about the situation]
Tone: [Professional / Friendly / Direct]
Length: [Short / Medium / One page]
Key points to include: [List your main ideas]

Don't be vague here—be specific and stay focused. The better your input, the better your output.

time-saving tip with ChatGPT

The goal isn't to have AI write 100% of it. The goal is to have a rough version you can edit. What's interesting here is that editing is always faster than writing from scratch.

Task 3: Prepare Content Before Meetings

Time saved: ~30 minutes/week.

The reality: Walking into a meeting unprepared is a time debt you pay twice—once in the meeting itself, and again trying to catch up on what you missed.

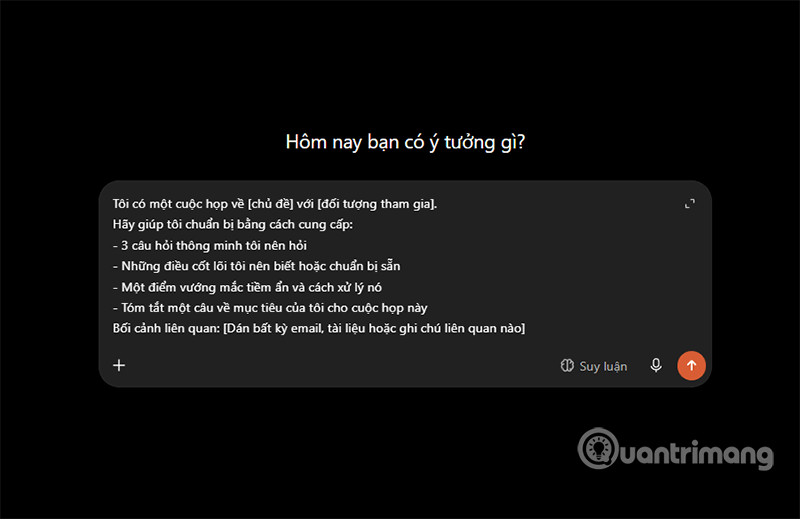
Sample prompt:

I have a meeting about [topic] with [attendees].
Help me prepare by providing:
- 3 smart questions I should ask
- Key things I should know or prepare
- One potential issue and how to handle it
- One-sentence summary of what I'm trying to achieve
Relevant context: [Paste any emails, documents, or notes]

Five minutes of prep with this prompt beats 30 minutes of improvising in the conference room.

time-saving tip with ChatGPT

Task 4: Answer Repetitive Messages and Emails

Time saved: ~45 minutes/week.

The reality: Every job has the same questions, requests, and reminders popping up constantly. AI never gets tired of drafting responses to them.

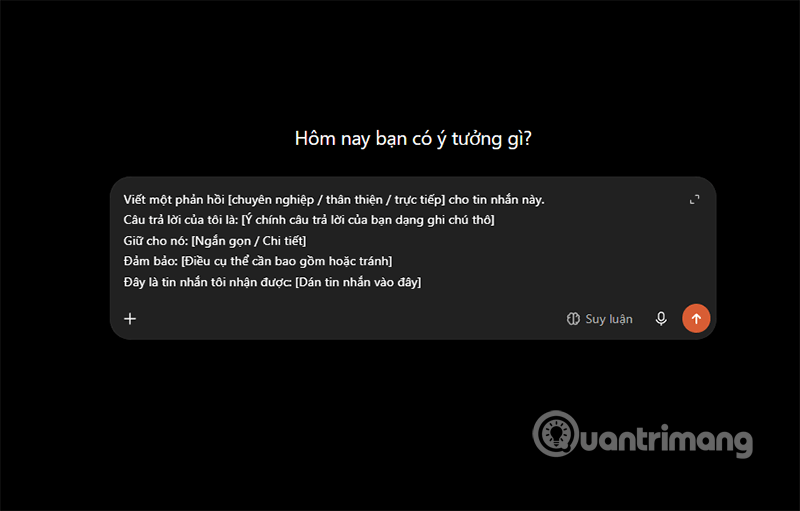
Sample prompt:

Write a [professional / friendly / direct] response to this message. My answer is: [Your main point in rough notes]
Keep it: [Brief / Detailed]
Make sure to: [Specific things to include or avoid]
Here's the message I received: [Paste it here]

Works great for email, Slack, Zalo, customer requests... Draft in 10 seconds, tweak in 30 seconds, send.

time-saving tip with ChatGPT

Task 5: Turn Meeting Notes Into Actionable Items

Time saved: ~30 minutes/week.

The real concern is that most meeting notes just sit in a document and never see the light of day again. This prompt transforms them into something you can actually use.

Sample prompt:

I just had a meeting. Here are my raw notes: [Paste them]
Please give me:
- A clean 3-bullet summary of what was decided
- A clear list of action items with owners (if mentioned)
- Follow-up questions that still need answers
- A short recap email I can send to attendees

time-saving tip with ChatGPT

One prompt. Four outputs. Your notes go from chaos to completion.

Task The Old Way With AI Prompts The Win
Read emails/documents Read line by line, lose focus AI extracts 5 key points in 10 seconds Grab what matters instantly
Write reports/proposals Spend 20-30 minutes staring at blank screen AI generates rough draft in 15 seconds Kill procrastination, focus on editing
Prepare for meetings Walk in with no direction AI suggests questions and talking points Control the room, hit your goals
Meeting notes Messy notes, easy to forget tasks AI creates action list and recap email Stay on track, nothing slips through

Get Started Right Now

Pick exactly one task from the list above—the one eating the most time right now. Apply the matching prompt before you finish work today. You'll be shocked at how many hours you suddenly have back each week.


Description: Discover practical AI prompts to automate repetitive office tasks. Save hours weekly on emails, meeting prep, drafting, and more.

Related Articles

How to Verify AI Search Results: A 4-Step Fact-Checking Guide

On
How to Verify AI Search Results: A 4-Step Fact-Checking Guide

AI-powered search has become the norm. Tools like ChatGPT and Gemini now feel as natural as talking to an expert, and Google's AI Overview feature regularly dominates the top of search results, pushing traditional links below the fold.

There's no denying the convenience—you get synthesized answers without clicking through dozens of websites. But here's the uncomfortable truth: that convenience doesn't guarantee accuracy. AI systems regularly serve up misleading information, cite unreliable sources, or confidently state things that simply aren't true.

What's interesting here is that most people don't know how to defend themselves against these errors. Understanding how AI search actually works—and building a solid fact-checking routine—is now essential.

How AI Web Search Actually Works

Every AI search query passes through three distinct phases:

[ PHASE 1: Parse the query ] ➔ [ PHASE 2: Retrieve web pages ] ➔ [ PHASE 3: Synthesize response ]

Query Analysis (Parsing & Interpretation): AI breaks down your question. Systems like Google Gemini use "query fan-out" technology—splitting complex questions into multiple smaller queries to run searches in parallel.

Example: Ask "What attractions suit seniors in Dalat under 500,000 VND?" and the AI automatically generates separate searches for ticket prices, age-appropriate activities, and specific Dalat locations.

  • Data Retrieval (Retrieval): The system scans web pages (via Google, Bing, or its training data) to pull relevant information. The key difference from traditional search: AI prioritizes content relevance over page popularity.
  • Response Synthesis (Synthesis): AI stitches together the retrieved data and rewrites it as a conversational, digestible paragraph.

Your 4-Step Verification Process

The real concern is that users treat AI answers as gospel. Don't. Apply this four-step verification process every time:

Step 1: Scrutinize the Citations

AI usually includes links at the end of answers. Problem: those links aren't always reliable.

  • The reality: Research analyzing tens of thousands of Google AI Overview results found that 11% of responses (roughly 1 in 10 answers) weren't actually supported by the cited sources themselves.
  • What to do: Click the citation links directly. Use Ctrl + F to search for the specific claim, statistic, or keyword in the original article. If it's not there, the AI hallucinated.

AI information verification tips

Step 2: Evaluate the Source Credibility

AI picks sources based on relevance, not reputation. This means it might pull data from an obscure forum or personal blog instead of official reports.

  • The reality: Studies show that ChatGPT's GPT-4 model only cites genuinely trustworthy sources about 71% of the time. That leaves roughly 3 out of every 10 sources coming from unverified websites.
  • What to do: Check the domain. Prioritize government sites (.gov), educational institutions (.edu), reputable news outlets, and official brand websites.

Source TypeTypical ReliabilityNotes
.gov⭐⭐⭐⭐⭐Government agencies. Best for laws, statistics, healthcare, policy, official data
.edu⭐⭐⭐⭐–⭐⭐⭐⭐⭐Universities and educational institutions. Good for research, academics, science
Peer-reviewed journals⭐⭐⭐⭐⭐Strongest for scientific research
.org⭐⭐⭐–⭐⭐⭐⭐⭐Varies widely depending on the organization behind it
.com⭐⭐–⭐⭐⭐⭐Can be trustworthy, but verify who wrote it and why
Blogs, forums, personal sites⭐–⭐⭐⭐Always double-check independently

Step 3: Catch Overconfident AI Making Things Up

Traditional search engines show "No results found" when they have nothing. AI does the opposite—it always tries to answer, assembling old training data fragments into plausible-sounding nonsense, delivered with absolute certainty.

  • The reality: AI systems will confidently fabricate answers rather than admit gaps in their knowledge.
  • What to do: For niche topics or very recent events, ask the AI for at least three independent sources. Better yet, verify using conventional search engines yourself.

AI information verification tips

Step 4: Verify Against Primary Sources

For decisions that matter—purchases, travel plans, legal or medical advice—treat AI answers as a starting point only, not the final word.

If AI suggests tourist attractions, admission prices, or opening hours, visit the venue's official website or call them directly before you go. Takes 60 seconds. Could save you hours of frustration.

Why This Matters

  • Avoid real-world damage: Bad information about train times, ticket prices, event schedules, or regulations can actually hurt you. Fact-checking prevents that.
  • Save time fixing mistakes: Spending 30 seconds to verify a source beats hours cleaning up a mess caused by wrong data in a report or project.
  • Build critical thinking habits: You'll develop the instinct to question information actively—essential armor against AI-generated misinformation and deepfakes.

AI Web Search is genuinely useful technology. It accelerates information gathering. But think of it as a research assistant that collects raw material, not as an oracle that delivers truth. The final verification step is always yours. Keep healthy skepticism close, check your sources, and never blindly trust what AI tells you—no matter how confident it sounds.


Description: Learn how to spot unreliable sources and catch AI hallucinations. Essential fact-checking steps for AI-powered search results.

Related Articles

How to Generate Automatic Document Summaries in Google Docs

On
How to Generate Automatic Document Summaries in Google Docs

Google Docs just rolled out a genuinely useful feature: the ability to auto-generate document summaries without ever touching the Gemini chat window. Here's what makes this interesting—the AI reads through your entire document, identifies the key points, and inserts a clean, structured summary right where you need it. No extra steps. No jumping between tools.

The system works by having AI scan your full document content, extract the most important information, and deliver a concise summary that you can embed directly into your Docs file. Ready to try it? Here's exactly how to do it.

How to Create an Automatic Document Summary in Google Docs

Step 1:

Open the document you want to summarize. Click the exact spot where you'd like to insert the summary. Then navigate to Insert > Elements > AI-Generated Summary Box.

AI-Generated Summary Box in Google Docs

Step 2:

Wait while the AI processes your document. It's analyzing the content, pulling out key points, and building a summary framework. Once complete, you'll see the generated summary appear below.

AI-generated summary content on Google Docs

Not happy with the result? Tap the refresh icon to generate a different version.

AI-generated summary content on Google Docs

You'll get a fresh summary summary option like this one.

Refreshing AI summary content in Google Docs

Step 3:

Ready to insert it into your document? Click the checkmark icon to confirm.

Inserting AI summary content into Google Docs

Here's the thing: once it's in your document, Google Docs lets you edit it like any other text. Adjust the wording, tweak the formatting, restructure the layout—whatever works best for you.

Editing AI summary content in Google Docs

Step 4:

Want to take it further? You can refine the summary using Google's AI writing tools. Highlight the summary text and click the improve/polish icon.

Refining AI summary content in Google Docs

Gemini will rewrite the section in your preferred style. If you like the new version, just hit Accept and you're done.

Rewriting AI summary content in Google Docs

This feature works great for practically any document type—long reports, meeting notes, project plans, research papers. Basically anything where you need to pull out the important stuff fast.


Description: Learn how to use Google Docs' new AI-powered summary feature to automatically create concise summaries of your documents.

Related Articles

Complete ChatGPT Guide: How to Use It, Troubleshoot Common Problems

On
Complete ChatGPT Guide: How to Use It, Troubleshoot Common Problems

ChatGPT has evolved dramatically since its launch. Early adopters barely recognize it now compared to the original version. Today, it's no longer just a chatbot—it's become a full-featured productivity assistant you can use for research, writing, automating workflows across your other apps, and much more.

If you're eager to integrate ChatGPT into your workflow but aren't sure where to start, you've landed in the right place. This guide covers everything you need to know about using ChatGPT effectively.

What is ChatGPT?

ChatGPT is an AI chatbot developed by OpenAI that processes text, images, and audio inputs (depending on your model). Here's what it can actually do for you:

  • Have conversations via voice or text, answering questions on virtually any topic
  • Generate written content—poems, blog posts, emails, and more
  • Brainstorm and develop ideas with you
  • Create, edit, and analyze images
  • Handle complex multi-step tasks across different apps (like researching a topic and building a presentation about it)
  • Search the internet for current information
  • Build charts and graphs from your data
  • Analyze datasets
  • Translate languages or convert design mockups into code
  • Control your computer and perform basic actions on your behalf
  • Essentially anything you'd expect from a multimodal AI trained on internet-scale data

Getting Started with ChatGPT

Here's the quick rundown on starting with ChatGPT (the process is nearly identical across web, desktop, and mobile):

  1. Head to chat.com or open the mobile app, then sign up or log in (completely free).
  2. Choose your mode: Chat for quick interactions or Work for complex projects.
  3. If you're on a paid plan, select your preferred AI model.
  4. Enter text, upload images, or use voice commands at ChatGPT's home screen.
  5. Once ChatGPT responds, you have several options:
    • Edit your original prompt
    • Enter a new follow-up
    • Review sources
    • Copy the response
    • Regenerate the response
    • Rate the response
    • Start a fresh conversation
    • Share the response

Let's dig deeper into each step.

1. Create Your OpenAI Account

First things first—you need a free OpenAI account. Visit chat.com and click Sign up for free. You can use an email address, Google, or Microsoft login. If using email, you'll need to verify a phone number to prove you're human, not a bot.

Already have an OpenAI account? Just click Sign in and start chatting.

Stuck on signup or login? Try refreshing the page. For specific login problems, check OpenAI's official help documentation.

2. Pick Your Mode

By default, conversations open in Chat mode (great for quick Q&A). But if you're doing longer, deeper work like research or document drafting, switch to Work mode at the top of the conversation.

ChatGPT conversation with Chat and Work mode tabs

3. Select an AI Model

Paid plan users can choose which AI model powers ChatGPT. Click the model dropdown in your chat window and select your preference. Each model has different strengths—newer ones are more capable but may be slower.

4. Ask Questions

There are several ways to input your request:

File and options menu in ChatGPT's message input bar
  • Type your prompt into the message box and hit Enter or click the up arrow.
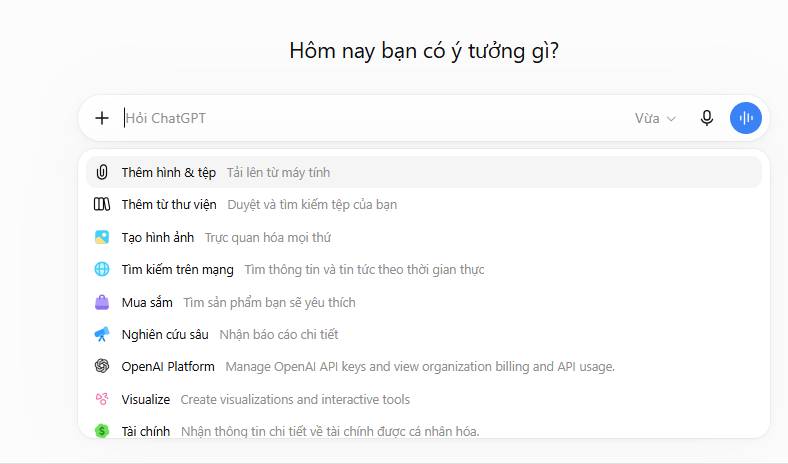
  • Use web search to let ChatGPT look up current information online. Click the + icon, select Web search, and type your question.
  • Try deep research to have ChatGPT scan hundreds of sources and files for a comprehensive answer with citations. Click +, choose Deep research, then enter your query.
  • Visualize data by clicking +, selecting Visualize, and describing what you want to see.
  • Search your company's apps (Business/Enterprise users). If you've connected apps like Google Drive or Slack, click + and choose Company knowledge to search across your own files.
  • Use voice input by clicking the microphone icon to speak instead of type.
  • Upload files or images by dragging them into the message box, or clicking + and selecting Add files & images.

5. Work with Responses

Within seconds, ChatGPT delivers an answer. Here's what you can do with it:

ChatGPT conversation highlighting interaction buttons for prompts and responses
  • Edit your prompt. Hover over your original message, click the pencil icon, make changes, and press Enter.
  • Send a follow-up. Ask ChatGPT to adjust its answer—it remembers your conversation context.
  • Check sources. Hover over source citations in the response to learn where ChatGPT found the information. Click to visit the original source.
  • Copy the response. Click the copy icon below the answer to grab it for sharing elsewhere.
  • Regenerate. Not happy with the answer? Click Retry to get a new one using the same prompt.
  • Rate the response. Click the thumbs up or down icon to help ChatGPT learn what's useful.
  • Branch the conversation. Want to explore a different direction without losing your chat history? Click More actions (...) and select Create branch in new chat.
  • Share your conversation. Click Share at the top to generate a unique link others can view. Enterprise users note: only your workspace members can access it.

Customizing ChatGPT

Tired of repeating yourself? If you always say "write in Python" or "use a conversational tone," ChatGPT can remember these preferences automatically.

Using Custom Instructions

Even on the free plan, you can set permanent instructions ChatGPT will follow. Here's how:

  1. Click your profile, then select Personalization.
  2. Toggle Custom instructions on.
  3. Enter any preferences you want ChatGPT to remember—like your writing style or preferred output format.
  4. Click Save.
ChatGPT personalization settings with custom instructions

Now ChatGPT will automatically apply these instructions unless you override them in a specific prompt. The real benefit here is that you can toggle them on or off whenever you need something different.

Pro tip: If you need ChatGPT to handle multiple roles, create separate Projects and set unique instructions for each one.

Building Custom GPTs

Paid users can create personalized versions of ChatGPT—called GPTs—programmed with custom instructions. You can also use pre-built options like Data Analyst. Free users can access existing GPTs but can't create new ones.

Here's the quick process:

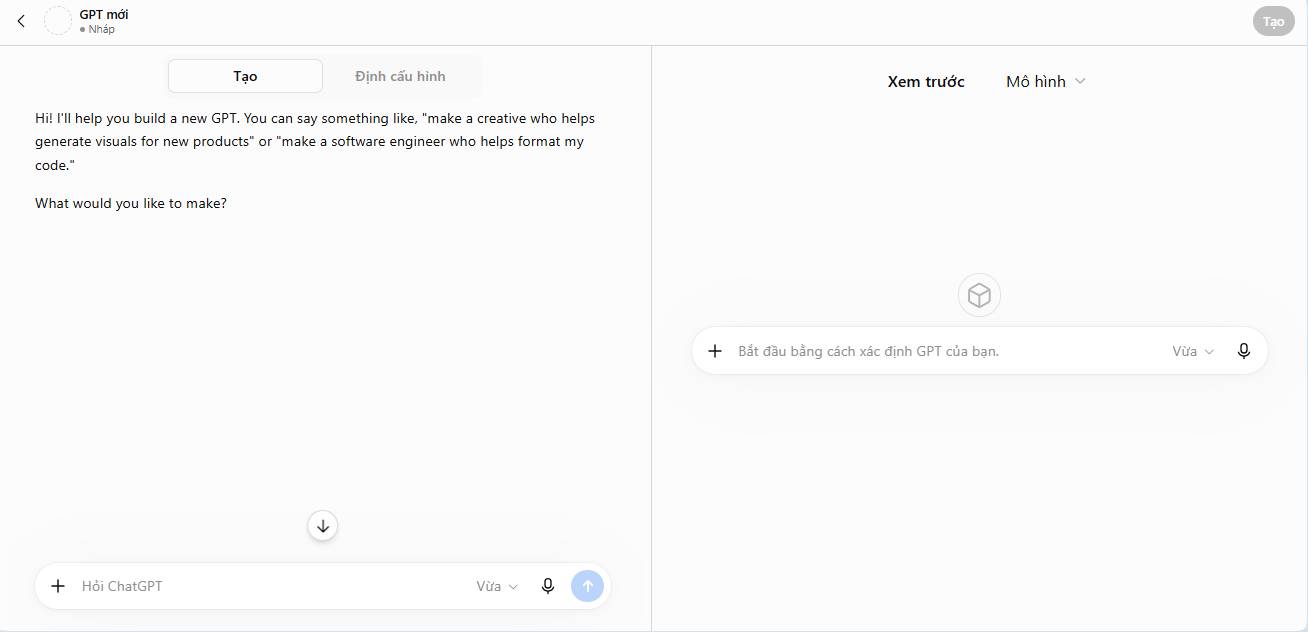
1. In ChatGPT, click GPTs in the sidebar.

2. Click Create in the top right.

3. Type your instructions into the message box and chat with the GPT builder until you get what you want.

4. Click Configure for advanced customization. You can rename your GPT, refine instructions, upload knowledge files, and set up actions.

5. Click Create, then choose how to share it.

6. Click Update.

You can also use custom GPTs from any conversation—just type @[GPTName] followed by your question in the message box.

Voice Conversations

Want to chat without typing? ChatGPT's voice mode lets you have natural conversations with the AI. Here's how it works on the web (mobile works similarly):

1. Open a ChatGPT conversation and click the Voice icon (sound waves) in the message box.

ChatGPT message box with voice mode option

2. When a soothing circle appears on screen, start speaking.

Direct voice conversation with ChatGPT

3. ChatGPT responds via voice automatically—no send button needed. Interrupt naturally like in a real conversation if you want to pause it.

4. To exit voice mode, click the Voice icon again (it becomes an X while active).

When you finish, the full conversation appears as text and saves to your history. Want different voice settings? Go to settings, click Voice, and pick your preferences.

ChatGPT voice settings with voice model options

Three voice mode options exist:

  • Live: The default mode. Most natural for back-and-forth conversation. Supports web search, memory, and visualizations in real time.
  • Advanced: Best for mobile when you want to share your screen or video during conversation.
  • Standard: Turn-based mode where your speech converts to text before ChatGPT responds. Works best in noisy environments or when you prefer text-based exchanges.

Uploading Images

Add images to your chats and discuss them with ChatGPT.

Via Web App

  1. Click the + icon in the message box and select Add files & images. You can also drag and drop files directly into the box, or add images from Google Drive and OneDrive (connect first if needed).
  2. Choose the images you want.
  3. Type your question.
  4. Press Enter.

Via Desktop App

  1. Click the + icon in the message box.
  2. Upload an image from your computer or drag and drop it into the box.
  3. Type your question.
  4. Press Enter.

Via Mobile App

  1. Tap the + icon in the message box.
  2. Choose to upload an existing photo or take a new one.
  3. If you want to discuss a specific part of the image, tap Comment, tap that area, then type your question.
  4. Tap Send.

Using ChatGPT Work Mode

ChatGPT Work (formerly ChatGPT Agent) goes beyond single-response answers. It's an AI agent designed for complex, multi-step tasks—research, automation across your apps, and delivering finished work. Available on desktop, it works the same across web and mobile.

Note: Work mode requires a paid ChatGPT plan (Plus or higher).

1. In a new conversation, click Work at the top.

2. Describe the task or project you want ChatGPT to complete.

3. Optionally connect apps you want Work to access or control—Google Drive, Gmail, etc.—via the plugin menu.

4. Watch ChatGPT's progress in the chat, answer its questions, and steer it as needed.

5. Once done, review the results and request edits or next steps in the same conversation.

Features Beyond Chat

Not everything in ChatGPT happens inside conversations. Here's how to use additional features to maximize your productivity assistant.

Note: Some features are only available on certain paid plans.

Projects Feature

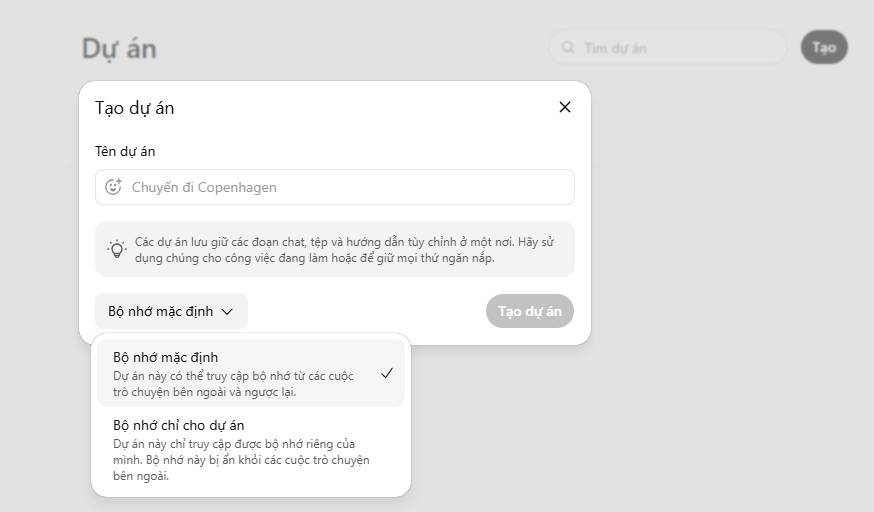
Projects group conversations, saved notes, custom instructions, and reference documents into organized workspaces. Switch between projects and ChatGPT automatically switches context with you.

1. In the ChatGPT sidebar, click Projects.

2. Name your project, pick an icon and color, then click Create.

3. You now have several options:

  • Start chatting. Type your prompt and chat normally.
  • Add knowledge sources. Click Sources, then Add source to upload files you want ChatGPT to reference. You can also drag and drop files here.
  • Add custom instructions. Click the three-dot menu in the top right, select Project settings, and enter instructions to shape how ChatGPT responds within this project.

To view chat history for any project, click the three-dot menu next to the project name in the sidebar and select Project home. Your conversations appear in the Chat tab.

Sharing Projects

Want to collaborate with others? You can share individual conversations or entire projects.

  1. Click the three-dot menu next to your project name in the sidebar.
  2. Click Share project.
  3. Invite collaborators by email or link. Email sharing lets you set permissions—edit or view-only.
  4. Click Invite for email, or Copy link and share as usual.

Scheduled Tasks

Set ChatGPT to run tasks automatically on a schedule. Quick overview:

1. Start a new conversation or set up a task from an existing one.

ChatGPT scheduled tasks home page with Scheduled section in sidebar

2. Describe the task and when you want it to run.

3. ChatGPT confirms the task is scheduled in the chat.

4. Click the task card below the confirmation to edit timing and frequency. Or go to the Scheduled section and click the pencil icon next to the task name.

5. Click Save.

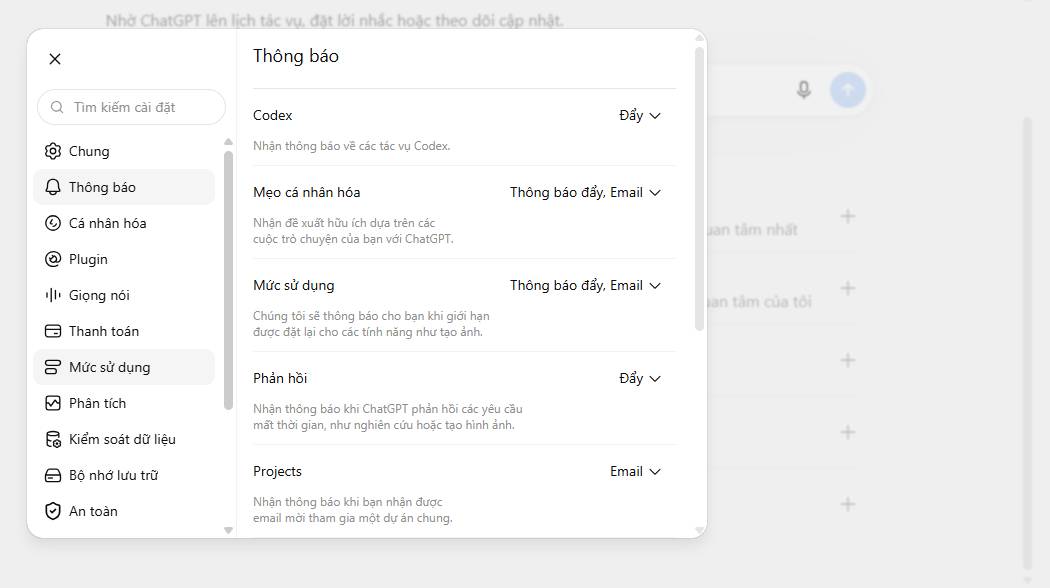
ChatGPT runs scheduled tasks automatically whether you're online or not and sends push and email notifications when complete. To change notification preferences, open settings, click Notifications, and choose your method.

Fixing ChatGPT Problems

ChatGPT errors come in many flavors: won't load, won't open, can't log in, not available in your country, not responding. The cause could be network issues, connectivity problems, or missing VPN. Try these fixes in order.

  • If you're experiencing network errors, check out our detailed network troubleshooting guide.

Refresh the Page

If ChatGPT shows a red error message, try refreshing the page. Your previous chats are safe—they'll stay in the sidebar on the left.

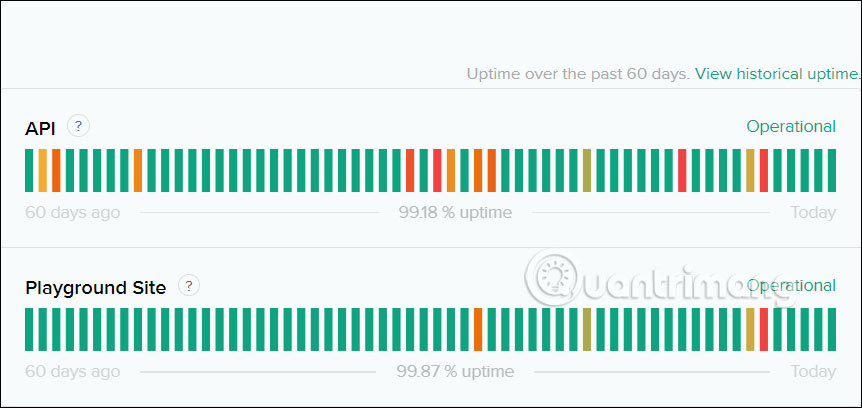
Check Server Status

When ChatGPT's servers have issues, you'll see red error messages and can't connect. Check OpenAI's status page:

https://status.openai.com/

This shows you whether OpenAI is experiencing outages or problems right now.

Checking OpenAI system status

Restart Your Browser

Sometimes the browser itself is the culprit. Close ChatGPT completely and restart your browser (save your other tabs first). What's interesting here is that browser memory issues often fix themselves with a full restart.

Clear Browser Data

If restarting doesn't work, try clearing your browser's web data. This removes your browsing history, cookies, and cache. You'll need to log back into ChatGPT after, but it often solves connection problems.

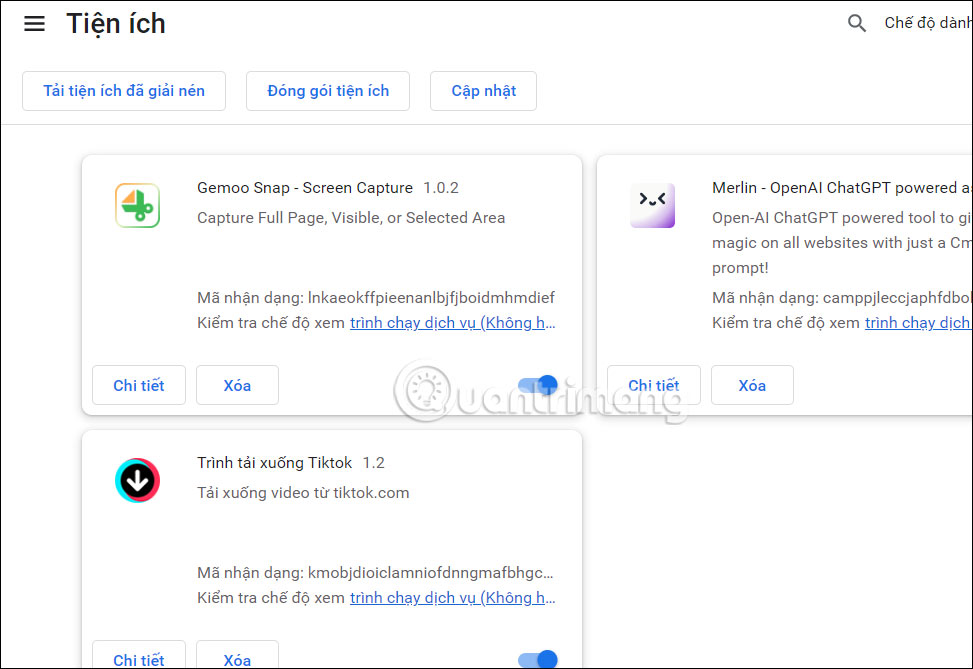
Disable Browser Extensions

Browser extensions you've installed can interfere with ChatGPT. Try disabling them, then restart your browser. The real culprits are often ad blockers or privacy tools—disable those first.

Disabling browser extensions

Reset Your VPN

If you're using a VPN to access ChatGPT, try turning it off and back on. Disconnect completely, wait a moment, then reconnect. Sometimes your VPN connection gets stale.

Restart Your Computer

If nothing else works, restart your computer. Save all your work first, power down completely, and start fresh. This clears system-level issues that browser resets can't touch.


Description: Master ChatGPT with this comprehensive guide. Learn setup, features, custom GPTs, voice mode, image uploads, and fixes for connection issues.

Related Articles

Automating Complex Workflows with Claude Code's /goal Command

On
Automating Complex Workflows with Claude Code's /goal Command

The /goal command in Claude Code transforms how you work with AI agents. Instead of the familiar back-and-forth of prompts and responses, /goal lets you define a high-level objective and let Claude run autonomously until it's achieved. This unlocks entirely automated workflows — the kind that actually save time. Let's dig into how to set it up, what makes goals work, and how to avoid the pitfalls that derail automation.

What /goal Actually Does in Claude Code

Most people interact with Claude Code conversationally. You ask for something, Claude delivers, you review, you ask for tweaks. It works fine for simple tasks. But when you need Claude to handle something complex without constant supervision, /goal changes the game entirely.

With /goal, you define a measurable objective and completion criteria. Claude doesn't just answer your prompt and wait — it thinks, acts, checks its own output, and keeps going until the goal is met. That continuous loop is what makes automated workflows possible.

This guide covers writing effective goals, setting exit criteria so Claude knows when to stop, coordinating with subagents for parallel work, and dodging common mistakes that send automated runs off track.

How /goal Fits Into Claude Code's Architecture

Claude Code is Anthropic's terminal-based programming agent. Unlike a chat interface, it has direct access to your file system, can execute shell commands, run tests, call APIs, and read error output — all without needing your input at each step.

The /goal command is built specifically for Claude Code's agentic layer. It switches Claude from response mode (waiting for your input) to planning and execution mode (working toward a defined result).

Goals vs. Regular Prompts

A normal Claude Code prompt is task-scoped: "Refactor this function to use async/await." Claude does the work, reports back, stops.

A goal is outcome-focused: "All unit tests pass, no TypeScript errors, and the CI pipeline returns green." Claude keeps working — fixing bugs, adjusting code, re-running tests — until that condition is met or it determines the goal is unreachable without human intervention.

That distinction matters. Goals are designed for processes that demand multiple dependent steps, iteration, and self-correction.

When to Use /goal vs. Standard Prompts

Use /goal when:

  • A task requires multiple rounds of execution and debugging
  • You want Claude working autonomously while you focus elsewhere
  • Success conditions can be stated clearly and verified programmatically
  • You're running Claude Code in headless or automated mode

Use standard prompts when:

  • You need tight control over each step
  • The task is a single, bounded operation
  • You're exploring or iterating interactively

Setting Up Your First Goal

Basic Syntax

The /goal command takes a plain-language description of your desired outcome:

/goal All tests in the /tests directory pass without modification to test files

That's the simplest form. Claude Code understands this is the target and begins working — reading relevant files, running tests, diagnosing failures, writing fixes, and re-running tests to verify.

Writing Effective Goals

Vague goals produce inconsistent results. The more precisely you describe the outcome, the better Claude Code can assess whether the goal is actually met.

Weak goal:

/goal Make the app work better

Strong goal:

/goal The Express server starts without errors, all /api routes return 200 status codes on the test suite, and no console.error calls appear in the output

The stronger version gives Claude three verifiable conditions. It knows what "done" looks like.

Principles for effective goals:

  1. Use verifiable conditions — Things that are measurable: test counts, exit codes, file existence, API responses.
  2. Avoid subjective language — "Clean," "optimized," or "better" are hard for Claude to evaluate programmatically.
  3. Define scope — Tell Claude which files, directories, or systems are in scope. Without scope boundaries, it might touch things you didn't intend.
  4. Include negative conditions where relevant — "Don't modify any files in /config" sets a clear boundary.

Defining Exit Criteria

Exit criteria are measurable conditions that tell Claude Code when to stop. They're the most critical part of any automated workflow.

Without clear exit criteria, Claude Code might:

  • Stop too early (before the task is fully complete)
  • Overshoot (making unnecessary changes after the goal is met)
  • Loop infinitely trying to fix something that can't be fixed without human input

Types of Exit Criteria

Command Exit Codes

The simplest form. Claude runs a command and the goal is met when it exits with code 0:

/goal `npm test` exits with code 0 and all 47 test cases show as passing

File State Conditions

The goal is met when a specific file exists, contains specific content, or has been modified:

/goal A file named CHANGELOG.md exists in the root directory with entries for all commits since the last tag

API Response Conditions

Useful for integration work:

/goal GET /health returns {"status": "ok"} with a 200 response after the server starts

Combined Conditions

You can layer multiple criteria:

/goal TypeScript compilation succeeds with zero errors, all Jest tests pass, and the build artifact exists at /dist/index.js

Setting Iteration Limits

Here's what's important to know: without bounds, Claude Code will keep trying if it thinks progress is possible. For complex tasks, you might want to specify stopping conditions in case the goal becomes unreachable:

/goal All database migration scripts run successfully in sequence. If any migration fails after three retry attempts, stop and report the failure with the full error output.

This prevents Claude from spending hours on something that needs human intervention.

Running /goal in Headless and Automated Modes

The /goal command really shows its value when you run Claude Code without interaction — as part of a CI pipeline, a scheduled job, or an automated trigger.

Headless Basics

Claude Code supports headless mode through the --headless flag (or equivalent environment variable), which removes interactive prompts and runs completely autonomously. Combined with /goal, you get a self-contained agent executing a workflow from start to finish.

Example shell command:

claude-code --headless --goal "All unit tests pass and the build artifact is generated at /dist"

This is how you embed Claude Code into automated systems: a CI job calls Claude Code with a goal, Claude handles the work, and the job succeeds or fails based on the exit code.

Logging and Observability

When running headless, always enable logging. Claude Code outputs a detailed trace of its reasoning and actions — this is your audit trail if something goes wrong.

claude-code --headless --goal "..." --log-file ./claude-run.log

Review the logs after any unusual run to understand what Claude did, what it tried, and where it made decisions.

Integrating with CI/CD Pipelines

A common pattern is triggering Claude Code when tests fail on a feature branch:

  1. Tests fail in the pipeline
  2. CI triggers a Claude Code step with the goal: "Fix the failing tests without modifying test files."
  3. Claude Code handles the errors and commits fixes
  4. CI re-runs the original test step to verify

This works best for deterministic errors — type mismatches, failed assertions, missing imports — where fixes are clear-cut.

Combining /goal with Subagents

Claude Code supports multi-agent coordination, where a primary agent spawns subagents to handle parallel or specialized work. The /goal command operates at both levels.

What Subagents Do

Subagents are separate instances of Claude Code that the primary agent can invoke to handle specific tasks. The primary agent defines a subobjective, delegates it, waits for results (or runs other work in parallel), and integrates the output.

This is especially useful when:

  • Different parts of a task require different contexts
  • Work can be parallelized (fixing bugs in separate modules simultaneously)
  • You want to isolate risky operations in a subagent that can be restarted if it fails

How the Primary Agent Orchestrates

A primary agent running /goal can divide work like this:

  1. Analyze the overall goal and identify independent subtasks
  2. Spawn subagents for each subtask with their own objectives
  3. Monitor subagent results as they complete
  4. Integrate outputs and verify top-level exit criteria

You don't have to orchestrate this manually. Claude Code's planning layer automatically handles decomposition when you give it a goal complex enough to warrant parallel work.

Real Example: Refactoring Multiple Modules

Say your goal is:

/goal Migrate all database calls in /src to use the new ORM interface. All existing tests must still pass.

Claude Code might:

  • Spawn subagents for /src/users, /src/orders, and /src/products in parallel
  • Each subagent handles its module independently
  • The primary agent collects results, runs the full test suite, and handles any cross-module conflicts

What could be a sequential process taking hours becomes a much faster parallel operation.

Real-World Use Cases for /goal Workflows

Automating Test Fixes

One of the most immediately useful applications. After a dependency update or code refactor, run:

/goal All tests pass with the updated package versions. Do not modify test files or revert package versions.

Claude Code will trace failures back to the necessary code changes, fix them systematically, and verify each fix. Without this, it's a tedious manual process.

Generating Documentation

/goal Every public function in /src has a JSDoc comment with @param and @returns annotations, and no existing comments have been removed

Claude Code scans your codebase, identifies undocumented functions, writes appropriate docs, and verifies coverage — all in one autonomous run.

Migrating Dependencies

Upgrading a major version of a dependency (React 17 to 18, switching API clients, etc.) typically involves dozens of small, predictable changes. A goal like:

/goal Replace all usages of the deprecated axios.get() syntax with the new client.get() pattern across /src. TypeScript compilation must succeed when complete.

…gives Claude Code a clear task to systematically refactor your codebase.

Automating Pre-Release Checklists

/goal The following conditions are all true: build succeeds, all tests pass, no TODO comments remain in /src, CHANGELOG.md has an entry for v2.1.0, and the package.json version field reads "2.1.0"

This converts a manual multi-step checklist into a single autonomous process.

Common Mistakes and How to Avoid Them

Defining Scope Too Vaguely

Without clear scope boundaries, Claude Code might make unintended changes. Always specify what's in bounds and what's off-limits:

/goal All tests in /tests/unit pass. Only modify files in /src. Do not change any configuration files or package.json.

Using Unmeasurable Success Criteria

Avoid phrases like "improve performance" or "clean up the code" — they can't be verified programmatically. Use instead:

  • "Function X runs in under 100ms (measured by the benchmark script)"
  • "No function in /src exceeds 50 lines of code"

Not Defining Failure Handling

Always specify what Claude should do if the goal becomes unreachable. Without a fallback, it can spiral into infinite loops:

/goal All integration tests pass. If any test fails after three fix attempts, stop, revert changes to the affected file, and report the failure.

Packing Too Much Into One Goal

Overly broad goals ("rebuild the entire authentication module") are hard to evaluate and often stall. Break them into sequential, complementary subgoals instead.


Description: Master the /goal command in Claude Code to enable fully autonomous agents. Learn how to set objectives, define exit criteria, and coordinate subagents

Related Articles

4 Reasons Why You Should Host Your Own LLM

On
4 Reasons Why You Should Host Your Own LLM

Love them or hate them, large language models (LLMs) are becoming increasingly embedded into the internet, smartphones, and personal computers. Your office suite now includes Copilot, and Adobe's creative tools come with their own AI assistant. But here's the catch: relying on cloud-hosted LLMs comes with real trade-offs — particularly around privacy.

If privacy matters to you, hosting your own LLM could be the answer. Some tech enthusiasts have already started running Llama 3 and more recently DeepSeek on their own machines, and the results have been eye-opening. They've gained unprecedented control, customization options, and flexibility. Below are four compelling reasons why self-hosting an LLM might be a game-changer for you.

4. Enhanced Privacy and Security

Don't hand sensitive information over to ChatGPT

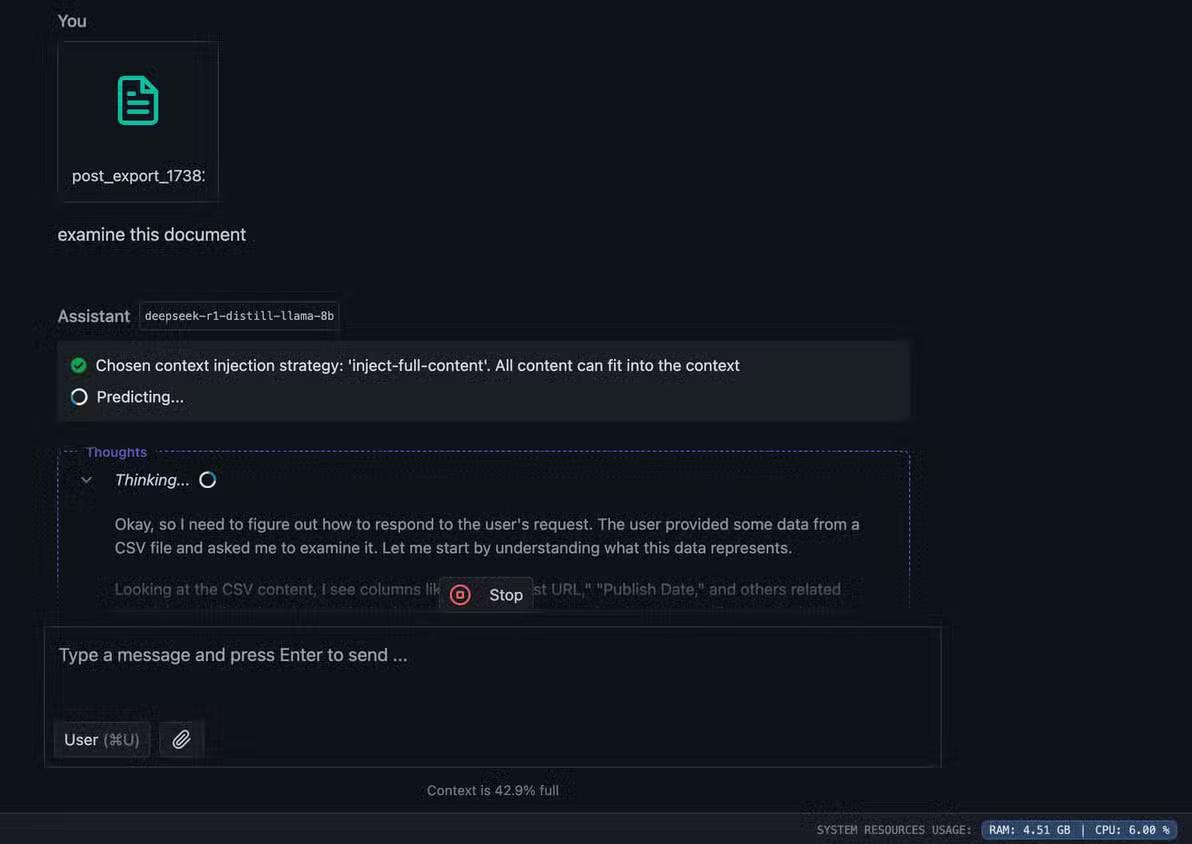
Privacy is perhaps the most compelling reason to host your own LLM. Sure, most LLMs are trained on publicly available internet data, and there's no getting around that. But many people understandably resist feeding additional personal information into these systems. When you're working with classified documents or analyzing sensitive health records, uploading them to ChatGPT is simply off the table. The real concern is ownership. The less you expose your personal data to cloud services, the better.

Running a locally-hosted LLM means you can accomplish most of the same tasks without granting these models access to your personal information. Better yet? You can actually disconnect from the internet entirely, and your self-hosted LLM keeps working perfectly fine. That level of privacy control is invaluable, especially for professionals regularly handling confidential materials.

Beyond that, local hosting dramatically reduces the risk of unintended data sharing.

3. Access Anywhere, Anytime

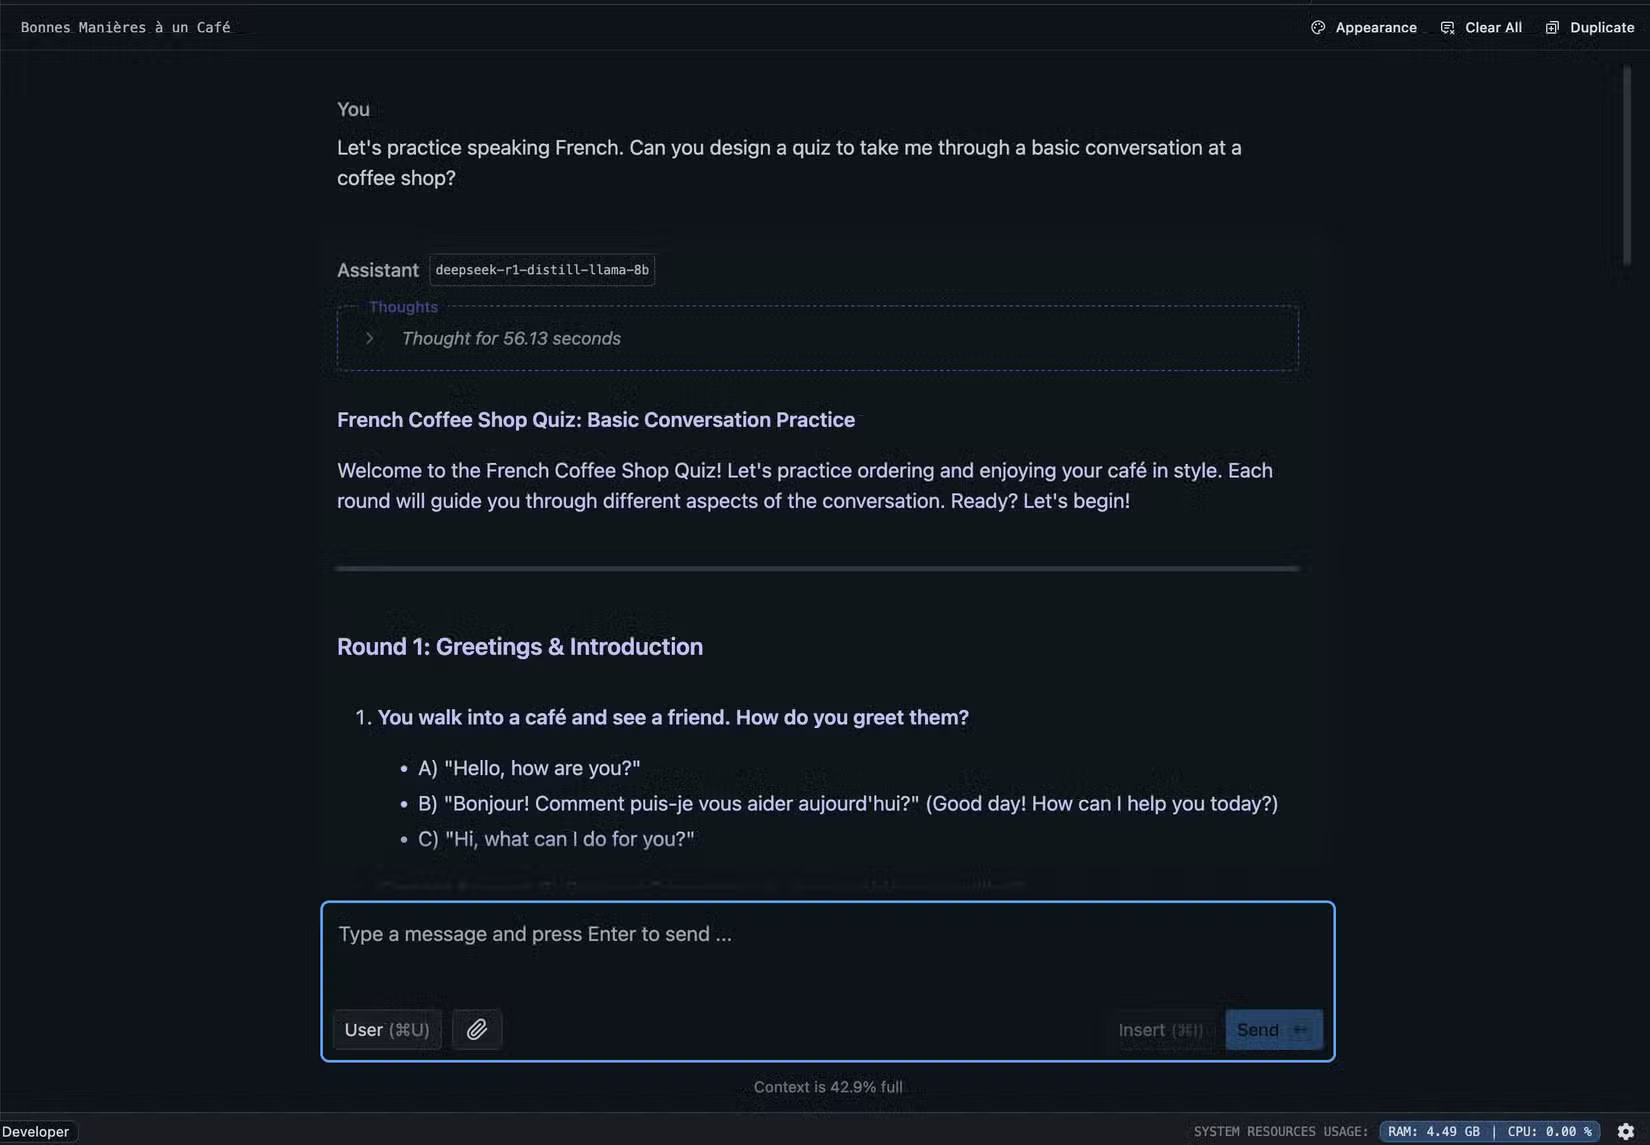
French practice results from LM Studio

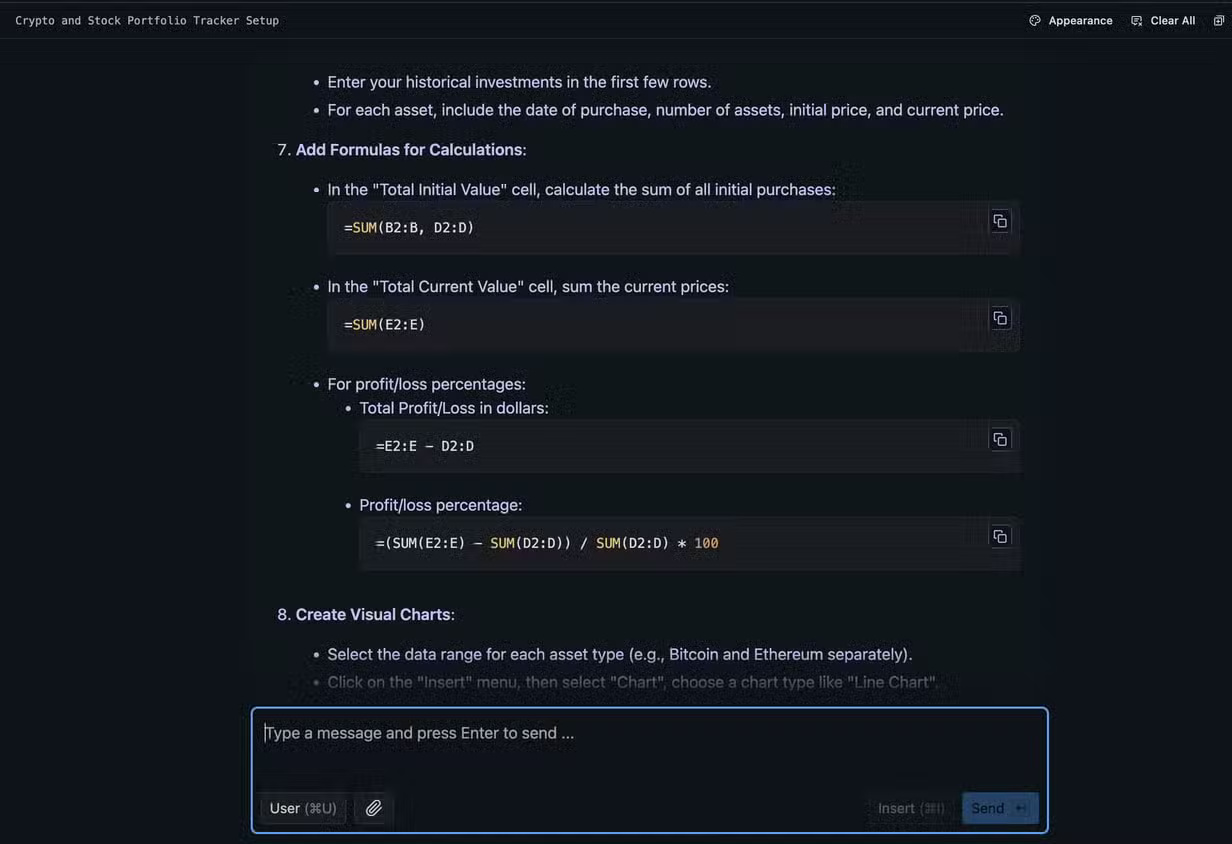
This brings us to portability. ChatGPT and Claude are great, sure, but they're useless without a solid internet connection. What happens when you're on a flight, or stuck on a train with spotty wifi? What if you're at a café with poor connectivity? You're out of luck.

That's where self-hosting truly shines. Picture this: someone recently ran Deepseek 7B on their MacBook Air during a flight to brainstorm presentation ideas. It wasn't as fast as cloud-based LLMs, obviously, but the extra few seconds to generate ideas, check grammar, or practice language? Nearly negligible.

The beauty of local hosting is independence from external connections. You're not tethered to wifi availability to get your work done. This fundamentally changes how you can work.

2. Cost Savings

Subscription fatigue is real

LLM Costs
LLM Costs

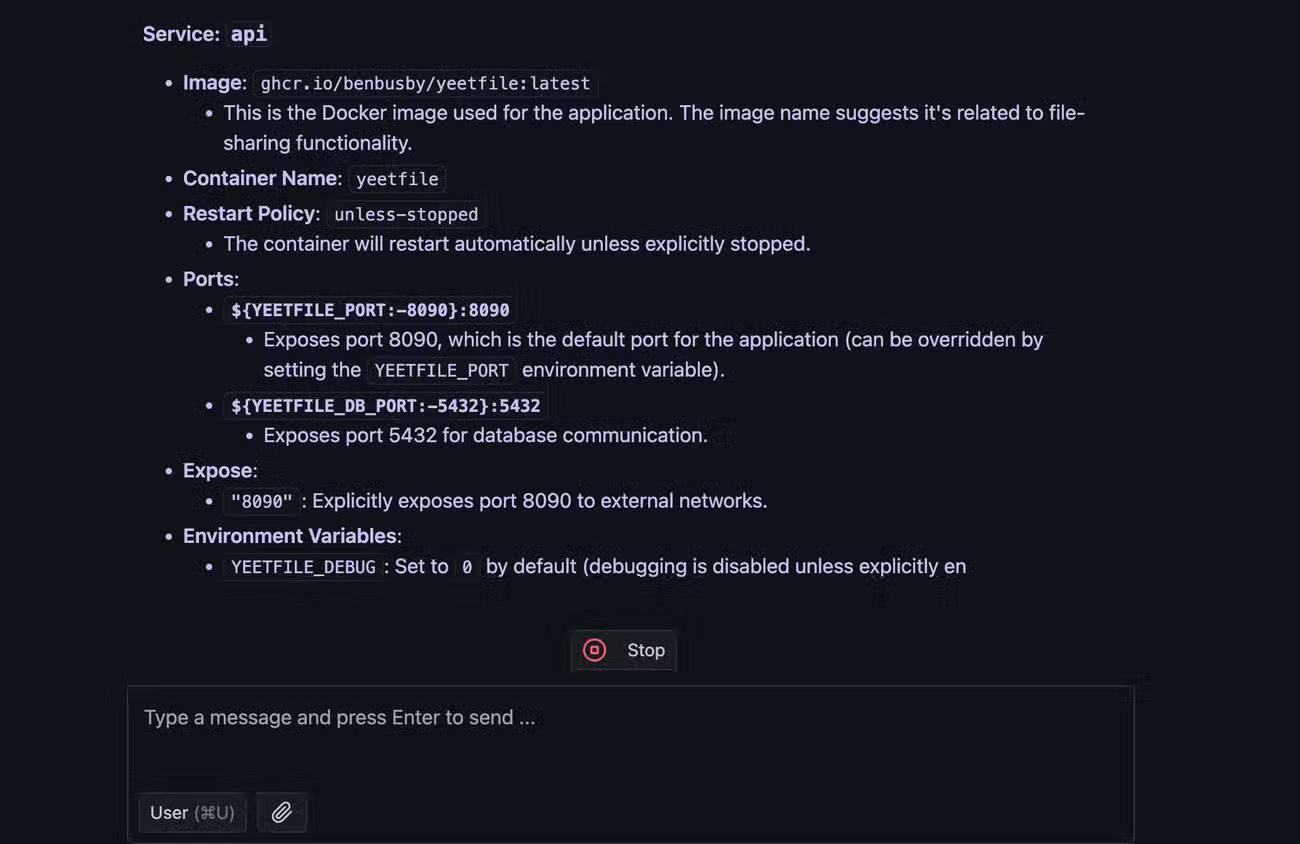
Let's be honest: nobody wants another subscription bill. No matter how good ChatGPT's premium tier is, most of what you actually need from an LLM doesn't require paid upgrades. Self-hosting your own model delivers significant cost savings, and if your use case isn't overly complex, it's a solid option — especially with user-friendly tools like LM Studio available.

While premium tiers from services like ChatGPT might offer better performance, they're often unnecessary for everyday tasks. Running your own model eliminates subscription fees entirely, which is a major win. And the availability of resource-efficient models like Llama 3 and Deepseek makes this option even more appealing.

Sure, you won't be running fully-featured models on your personal computer. But experience shows that quantized models remain perfectly useful for daily work.

1. Learning and Customization

Fine-tune AI models to match your exact preferences

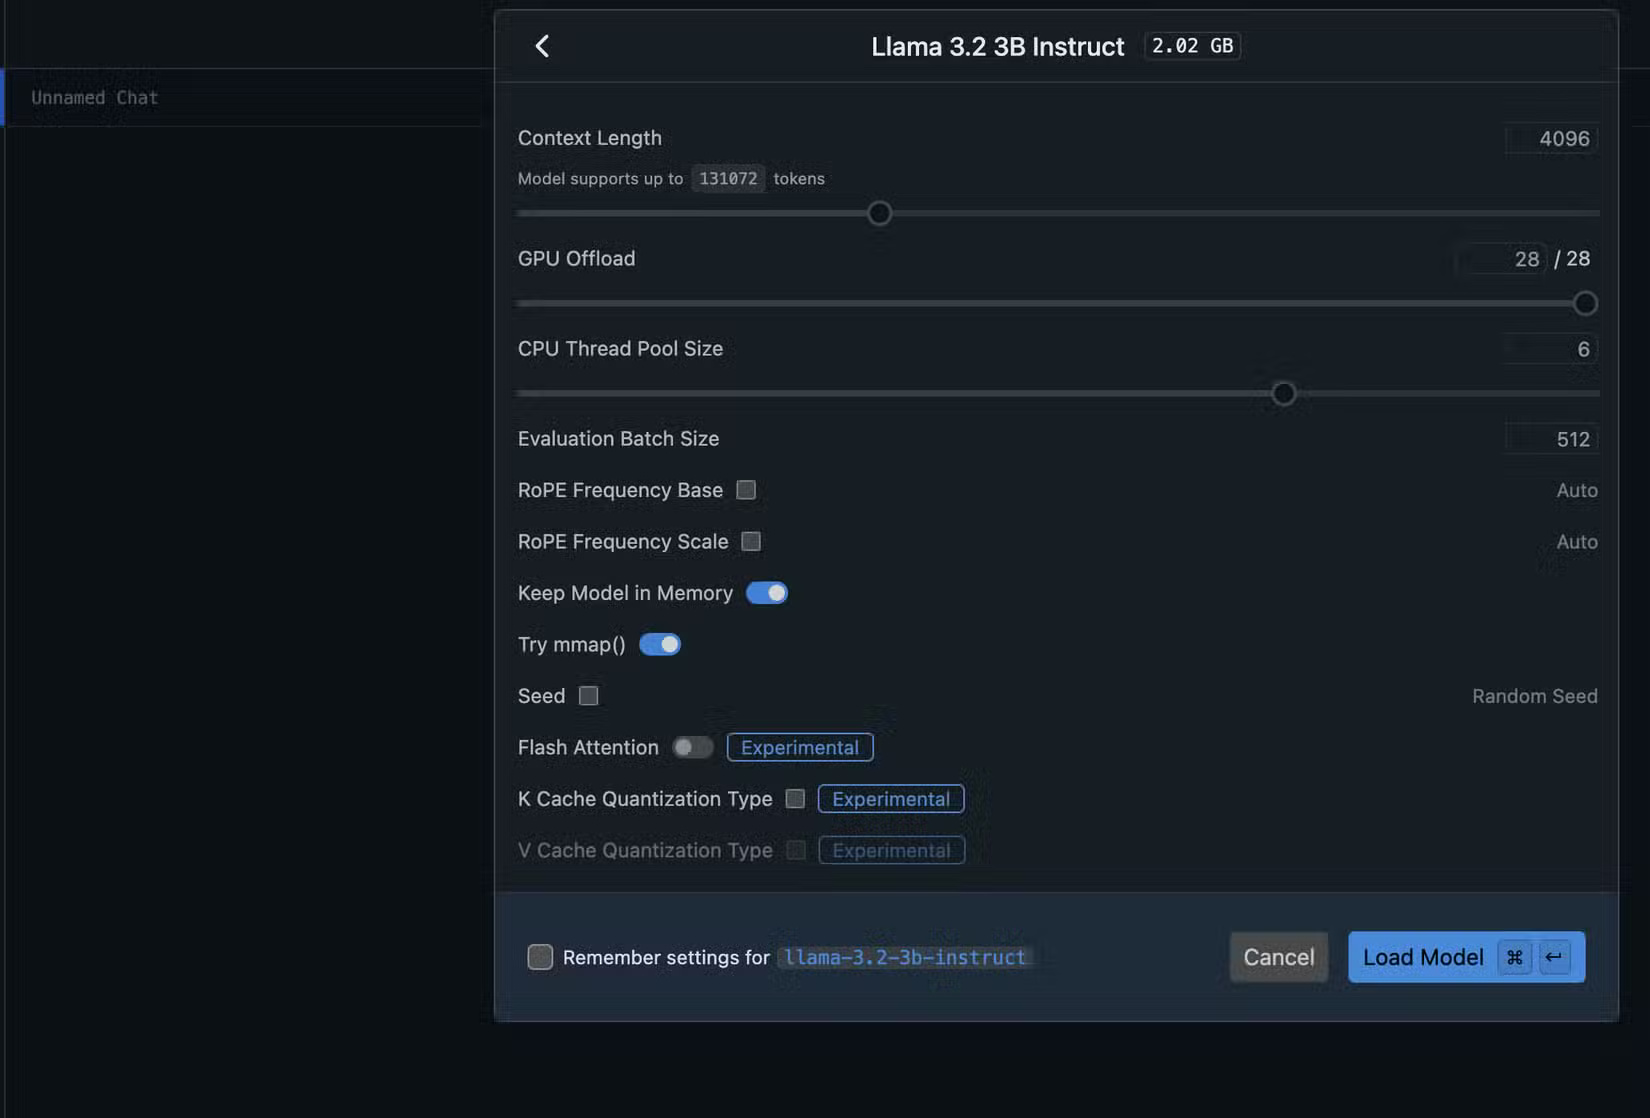
Llama 3 loading in LM Studio

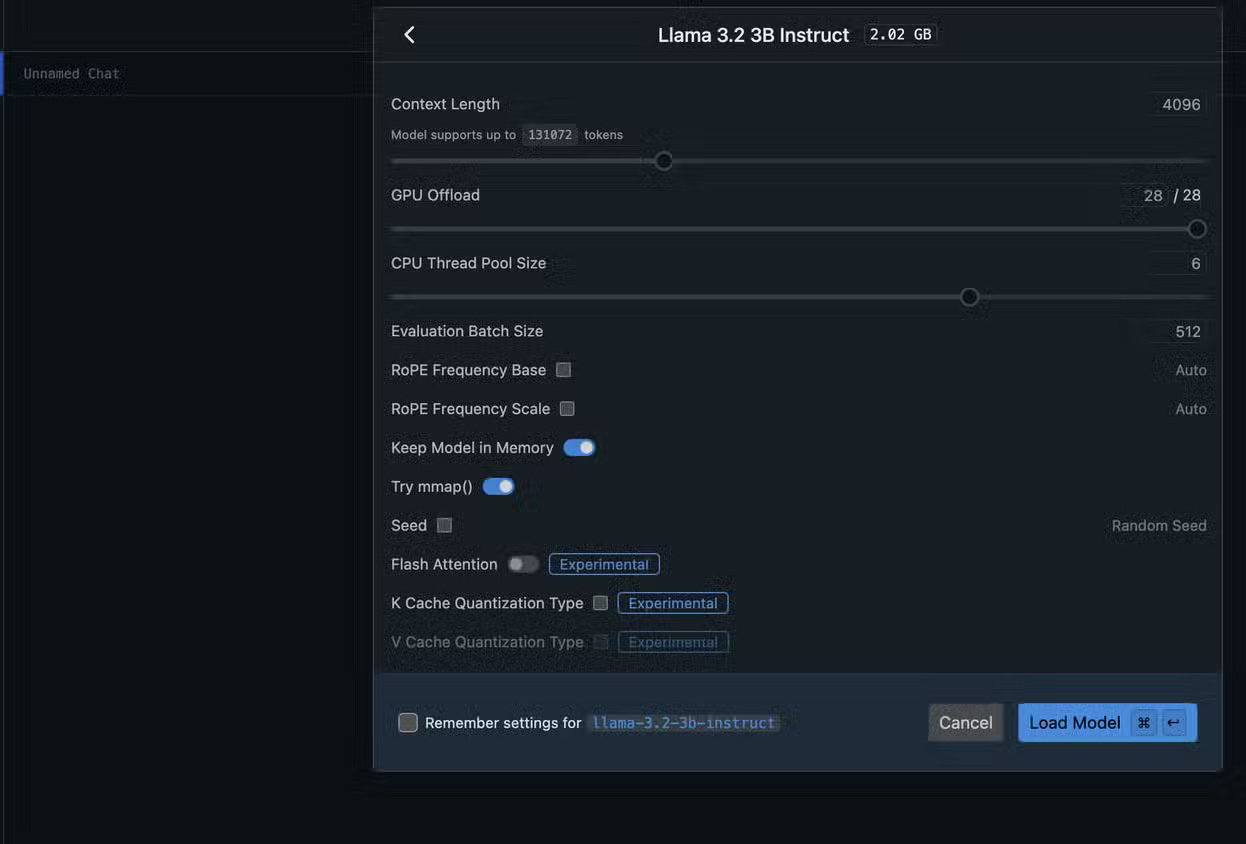
Now things get interesting. For the tech-minded, diving deep into the mechanics is natural. You want to understand how things work under the hood, and self-hosting an LLM gives you exactly that opportunity. You can experiment and optimize the model for your specific use cases — whether that's data analysis, conversations, or content creation. Not every tweak will succeed, but it's an excellent way to understand how these models function and shape them to your needs.

Self-hosting delivers unprecedented customization. Instead of being locked into preset options from cloud providers, you can adjust the LLM's behavior to better suit your requirements. This might mean tweaking conversation tone, optimizing for specific tasks, or integrating it with your daily tools. People genuinely love the flexibility to experiment and develop models exactly as they want. Of course, running sophisticated fine-tuning locally requires seriously powerful hardware. Many have experimented with model tuning through services like Amazon SageMaker instead.

What's interesting here is that some people have built custom tools connecting to DeepSeek APIs to analyze their personal investment data and health records. They didn't want these insights sent to cloud servers, but having local access lets them tailor the LLM precisely to their needs. This hands-on approach offers both practical knowledge and genuine satisfaction. You're writing custom scripts, discovering new capabilities, and tweaking the model until results match your expectations. That sense of ownership is truly invaluable.

Why Self-Hosting LLMs Is a Real Game-Changer

In summary, self-hosting LLMs has been transformative for many users, providing control, privacy, and customization that cloud-based models simply can't match. Of course, it's not without trade-offs — you'll notice differences in speed, convenience, and sometimes accuracy, particularly for intensive work. But the ability to experiment freely, protect your data, and run an AI system entirely on your terms makes the effort worthwhile. If you value privacy, enjoy tinkering with technology, or just want a more personalized AI experience, self-hosting an LLM might be exactly what you're looking for.


Description: Explore why self-hosting large language models gives you privacy, control, and customization that cloud-based AI services can't match.

Related Articles

Copyright © 2016 QTitHow All Rights Reserved